


Supply List:
- Canning Jars (various sizes)
- Decorative Scrapbook Papers
- ScorTape
- Scallop Circle Punch
- Cardstock
- Baby Wipes
- Scotch Tacky Glue
- Hot Glue
- Ribbon/Twine
- Hole punch
We are going to be playing with canning jars of all different shapes and sizes today. I love to use jars for all different kinds of things, but my favorite way to repurpose them is to make creative gift containers. We are going to be embellishing them with patterned paper, ribbons, and the cutest paper flowers.
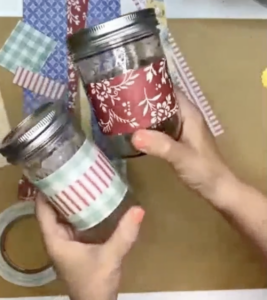
Adding Paper to Your Canning Jar
I have several strips of patterned scrapbook paper that I will be using to decorate my jar. First, I am going to use one of my 2-inch strips to wrap around the middle of my jar. My favorite adhesive to use to attach paper to any surface is ScorTape. I will add the ScorTape all around the edges of my paper and add it to my jar. You can also layer another smaller strip of paper over top if you would like.
Next, we are going to add some cute paper to the top of our jars! Take your jar top and trace around it on top of the paper that you would like to use. I’ll make some marks on my circle about where I think it indents in and cut it out. Add some tacky glue to your paper circle and apply it to your lid.

Embellish Your Creative Jars
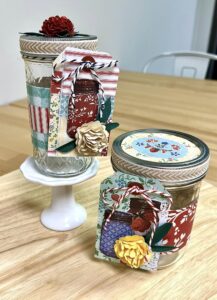
I have this gorgeous scrapbook paper with tags printed on it that have a fun and vintage vibe. I will go ahead and cut one of those out. I also have a patterned paper with mason jars on it, so I will cut a few of those out as well.
Next, I will make a paper flower! Use a scallop circle punch to cut shapes out of card stock. Punch about six pieces of paper and lay them between two baby wipes – we are softening the paper this way. Take a tiny dot of hot glue and stick each scalloped piece of card stock on top of each other. Then, take each piece and scrunch it up so that it resembles a flower!

Now, let’s finish off our creative canning jars! You can assemble your tag by gluing on some of the paper mason jars and a flower. You could also glue a flower to the top of your jar.
I have a piece of ribbon that I am going to add around the rim of my jar lid with ScorTape. Feel free to also tie some baker’s twine around your lid and slid your paper tag on to attach that to your jar too.
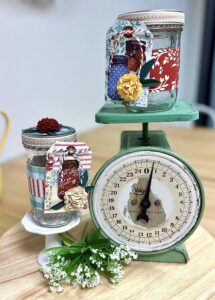
These are perfect to use for the “little somethings” that you may need to gift to neighbors, teachers, friends, family, and those you love. What can you put in these cute little jars? Candy, recipe mixes, hot cocoa, salsa, office supplies, tea packets, and more!
I go LIVE on my Facebook page every Friday at 11 am CST for a fun and easy Craft-n-Chat Session. Come learn something new while creating something beautiful!
Join the waitlist for the Page Builders Clubhouse! Shine a creative light on your most cherished memories with creative scrapbooking designs as unique as the experiences they highlight! The Page Builders Club House is a monthly membership that combines creative guidance and community to help you bust your scrapbooking stash, create beautifully unique layouts and banish “Blank Page Syndrome” for good!


0 Comments