


Supply List:
- “Time to Celebrate” Canvas Set Kit
- “Time to Celebrate” Canvas Set Kit WITH Display
- Mod Podge Matte
- Plastic Wrap
- Country Chic Paint – Simplicity
- Sandpaper or Sanding Block
- Diamond Stickles
- Pitt Pens
- Hot Glue
- Scissors
Have you been participating in our Welcome Home Canvas kits program? You’ll get a gorgeous shiplap house to hang and switch out different canvas decor. We release kits every few months, and we just launched a celebration kit!
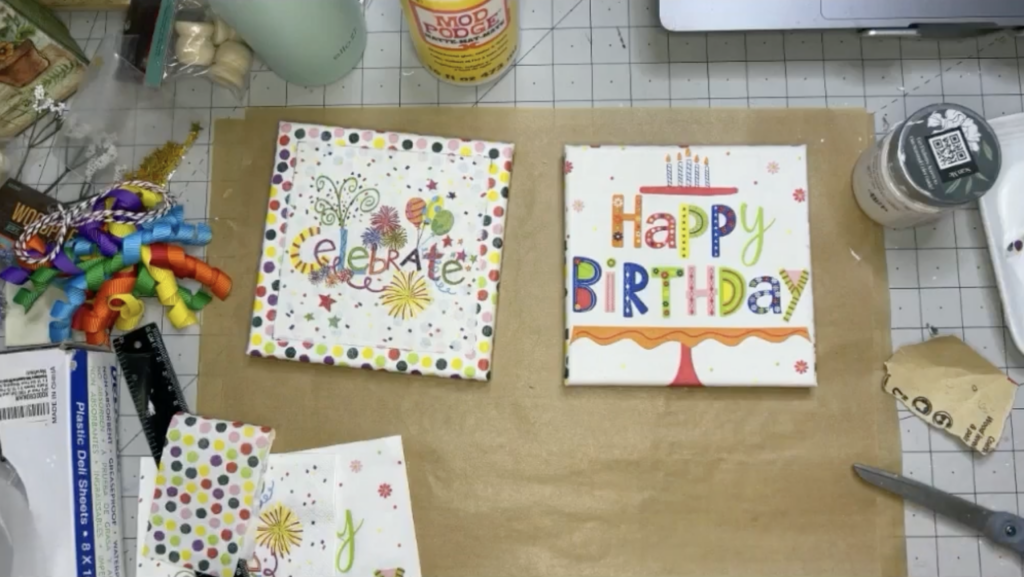
We’re diving into a delightful crafting adventure with the “Time to Celebrate” set for the Welcome Home Canvas Display. This special kit brings you not one, but two canvas creations designed to add a touch of joy to birthdays and other special occasions. Get ready to explore the art of napkin art on canvases – a fun and accessible technique perfect for beginners and seasoned crafters alike.

Adding Napkin Art to Your Canvases
Begin by separating the layers of your napkin until you reach the top layer of napkin art. Apply a coat of Mod Podge Matte onto your canvases, then carefully place the napkin on top. Cover it with plastic wrap and use your hands to smooth the napkin onto the canvas.
If there are any overlapping napkin edges, allow them to wrap around the canvas. Trim off the excess corners using scissors.
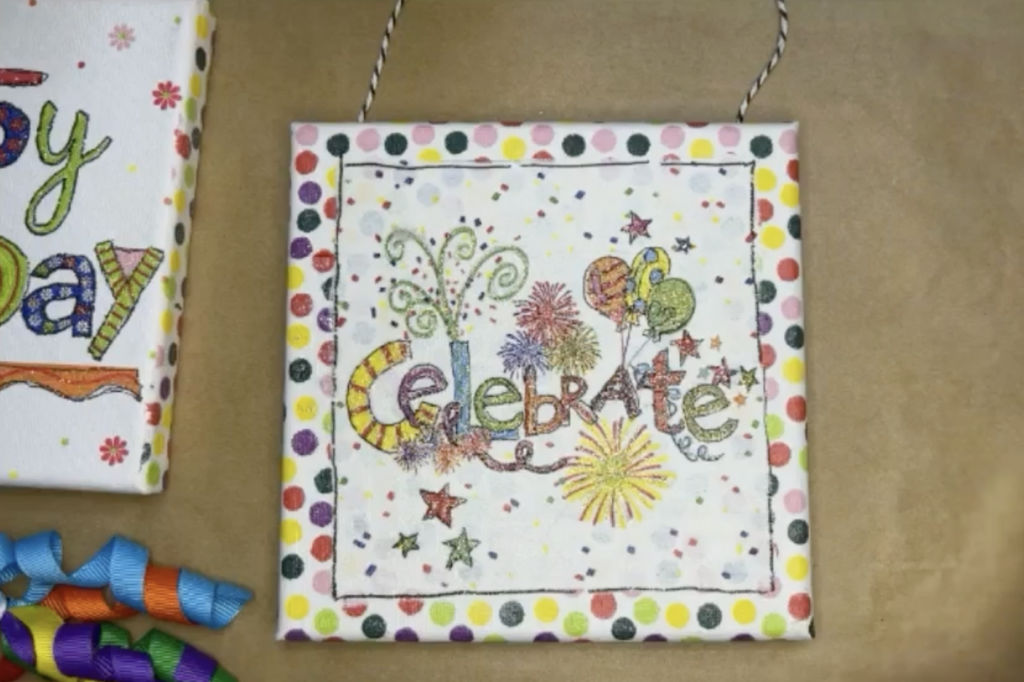
For the second canvas, start by adding the polka dot napkin to the background. Cut out a square of the “Celebrate” napkin and place it on top of the polka-dot canvas. Mark off the corners and use a ruler to create a square. Paint inside the square with Country Chic Paint – Simplicity and dry it with a heat tool. This will serve as the background for the “Celebrate” napkin.
Apply the “Celebrate” napkin using the same technique, then dry it with a heat tool. Add another coat of Mod Podge Matte to seal it and let it dry.
On the first “Happy Birthday” canvas, add some leftover polka dot napkin to the sides. Seal it with another coat of Mod Podge Matte and let it dry.
Adding Details and Embellishments
I love using Pitt Artist Pens to do my penwork on my napkin art. For my “Happy Birthday” canvas, I am going to add detail lines around each of my letters. This will make them pop even more! I’ll also outline the cake stand and candles.
Next, I’ll add Diamond Stickles to each of my letters, cake stand, and candles. I’ll also add some to a few of the polka dots on the side of my canvas.
On my “Celebrate” canvas, I’ll also outline all of my letters, balloons, and stars. I’ll also create a border line around the square. Then, I’ll add Stickles to all of the letters, stars, balloons, fireworks, and some of the polka dots.
Next, take the twine in your kit and cut it to 11 inches. Hot glue each end to the back of your canvas about an inch down from the top to create your hanger. Place a piece of scrap paper or felt on top just to secure it even more.
In your kit, you will have festive star confetti. Use a paintbrush to brush Mod Podge Matte onto one corner and use a pair of tweezers to lay your confetti on top. Do this for each canvas wherever you would like to add your confetti.
You will also have a party bow in your kit, which we will deconstruct. Cut the knot off that is holding all of the ribbons together. You will have a pile of beautiful curly ribbons. Separate the colors until you have two groups. Use the twine from your kit and tie it around the middle of the group of ribbons. Put a line of hot glue on the top of your canvas and secure your bow on top.

Enjoy making these beautiful celebration canvases to use to decorate your home. These are both wonderful to use for birthdays and any kind of celebration for those you love.
I go LIVE on my Facebook page every Friday at 11 am CST for a fun and easy Craft-n-Chat Session. Come learn something new while creating something beautiful!
Join the waitlist for The Napkin Club where Unique Makers can connect, learn, and be inspired to create with the Individual Unique Napkin Collections that you will receive every month! A place where Napkin Lovers can unite and be inspired!


0 Comments