Supply List:
- Birdhouse Kit
- Spring Door Kit
- Crackle Medium
- Country Chic Paints – Secret Garden, Tide Pool, Fresh Mustard, Simplicity
- Antiquing Liquid Wax
- Heat It Craft Tool
- Mod Podge Matte
- Paint Brushes
- Chip Brush
- Sandpaper
- Decorative Napkins
If you joined me for the Crafter-Noon Workshop earlier this month, we created a pretty spring door together! Today, I am showing you how to create these cute wooden birdhouses with many of the same techniques. I’m demonstrating step-by-step how to apply the crackle texture, add napkin art, and finish it off with all of the embellishments. Bring some vintage charm to your home with these beautiful spring pieces! (You can also grab these kits with all the supplies included!)

First, we are going to start by painting our birdhouses. I am using Country Chic Paints in Fresh Mustard. This is the color that will be showing through in your crackle. I’m also going to paint the rooftops with a pretty green color called Secret Garden. Let dry or dry with a heat gun.

Learn How to Add Crackle Medium to Your Birdhouse
Next, we’re going to use the crackle medium! Do not shake it, just gently stir it to mix it up. Then, apply your crackle medium to the birdhouses. You want this to be nice and wet on your wood. Let it dry for a little bit on its own. Then, dry it further with a heat tool.
While that’s drying, I’m going to take the little birdhouse stands and start working on those. I want this to have a wood grain, so I’m applying Antiquing Liquid Wax to give it a nice stain. I’m also going to add a little bit of this liquid wax on my green rooftops – just pouncing a bit on to give it a vintage look. After that is dry, I’ll use some sandpaper to give it more of a distressed look.

Now, we are going to paint our birdhouses with white chalk paint – the name is Simplicity. This is where you need to apply your paint very carefully. You’re applying the paint in one stroke. Do not brush your paint back and forth. Your crackle will start immediately! Let it dry and self-level. Once dry, paint the sides of your birdhouse too.
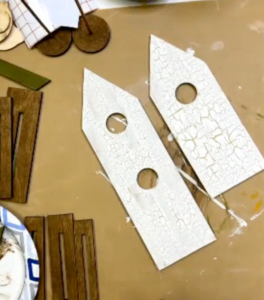
Applying Napkin Art to Wooden Birdhouses
I’m using a coordinating napkin that I also used on my door. I’m taking the floral napkin and cutting out a few flowers to add to each of my birdhouses. Separate the plys of your napkin until you have the top layer of napkin art.
Apply Mod Podge Matte to the area where you will be adding your napkin art flower and then lay your napkin on top. Take a dry chip brush and pounce it into those nooks and crannies. Then, take a plastic sheet, lay it over your napkin art, and smooth that napkin art down. Sand off any hanging edges with sandpaper. Seal your napkin art with another layer of Mod Podge Matte.
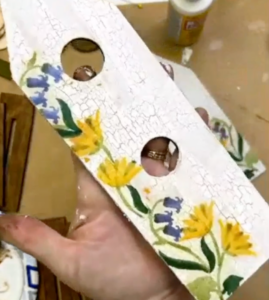
Finally, I’ll assemble my birdhouse pieces together. I’ll use some hot glue to assemble my birdhouse stands, and then add my rooftops to my birdhouses. Then, slide the birdhouses right into the stand. I’ll also hot glue some wooden perches.

Adding Embellishments to Your Birdhouse Crafts
I have some wooden birds that I’ll be adding to my birdhouses. In your kit, there are some spindles that you can use for your birds, but I am going to be actually adding them to my houses. I’m going to paint them with my yellow paint and napkinize the wings.
In the kit, you’ll also have a sign with some white vinyl that says “Welcome to Our Nest.” I’m going to paint the sign with the Antiquing Liquid Wax. Dry with a heat tool and add some distressing with your sandpaper.
Take your vinyl and remove the “negative” space until you just have the words. Take your transfer paper and place it on top of your words. Use an old credit card or gift card and just rub that transfer paper, then remove the back of the vinyl. Your words will stick to the transfer paper, which you can now add to your sign. Add some twine and apply it to your birdhouse!

There is so much you can add and decorate on these cute little birdhouses! They look so perfect with my door, and it all comes together to create some coordinating spring decor. There are so many fun tips and tricks to learn along the way as you create these birdhouses – from adding napkin art to creating some crackle to applying vinyl letters.

I go LIVE on my Facebook page every Friday at 11 am CST for a fun and easy Craft-n-Chat Session. Come learn something new while creating something beautiful! Grab the FREE workshop to create the spring door! You can also purchase kits with all of the supplies to make the spring door and these adorable birdhouses. Happy crafting!



Wonderful as always!
Clear precise directions and fabulous pics.
Heartfelt thanks Miss Tracey!! ????