


Supply List:
- Holiday Reversible Cutting Board DIY Decor Kit
- Mod Podge Matte
- Frixion Pen
- Simplicity Country Chic Chalk Paint
- Faber Castell Pitt Pen
- Stickles
- Glossy Accents
- Scor-Tape
- Hot Glue
Create a festive reversible cutting board decor piece with me! This step-by-step tutorial walks you through both sides of this fun DIY project. One side features a charming fall theme with pies and sunflowers, and the other sparkles with gingerbread cookies and holiday cheer. Let’s dive in!
Part 1: Fall Side of the Reversible Cutting Board
Step 1: Prep Your Board
Begin by removing the small leather hanger from the cutting board and setting it aside for later – it coordinates beautifully with both sides of the project. Your cutting board will have one side with a white stripe and one side without. For the fall design, you’ll want to work on the side without the stripe so the natural wood can shine through your napkin layers. Make sure your board is clean and dry before you begin.
Step 2: Apply the Recipe Card Napkin Background
To start, separate the layers of your recipe card napkin. Each napkin in this kit is three-ply, so you’ll need to remove the two plain white backings, leaving only the thin top tissue layer with the printed design. The “lick and stick” method works great, or you can dab a bit of Mod Podge between your fingers to make them tacky enough to grip the edges and pull the layers apart.
Apply a generous layer of Mod Podge Matte to about half of your board. You want to see visible white coverage – don’t skimp, since the raw wood will absorb some of the adhesive. Lay your napkin down carefully, starting along one edge, and use a plastic deli sheet to smooth the napkin from the center outward. Work slowly and gently to press the tissue into the wood grain without tearing it.
Continue working in sections, adding more Mod Podge as needed. Avoid trying to cover the entire board at once – the Mod Podge will soak in too quickly. If you have small gaps near the handle, just fill them in with leftover napkin pieces. Once the napkin is applied, let it dry for a few minutes, or use a heat tool on a low setting held a few inches away to speed things up. When it’s mostly dry, lightly sand the edges of the board to remove any excess napkin tissue. Reopen the hanging hole with your scissors and smooth the edges with sandpaper.
Finally, brush on a generous top coat of Mod Podge Matte over the entire surface. This coat helps the napkin become slightly translucent, allowing the natural wood grain to peek through. Set your board aside to dry completely before moving on.
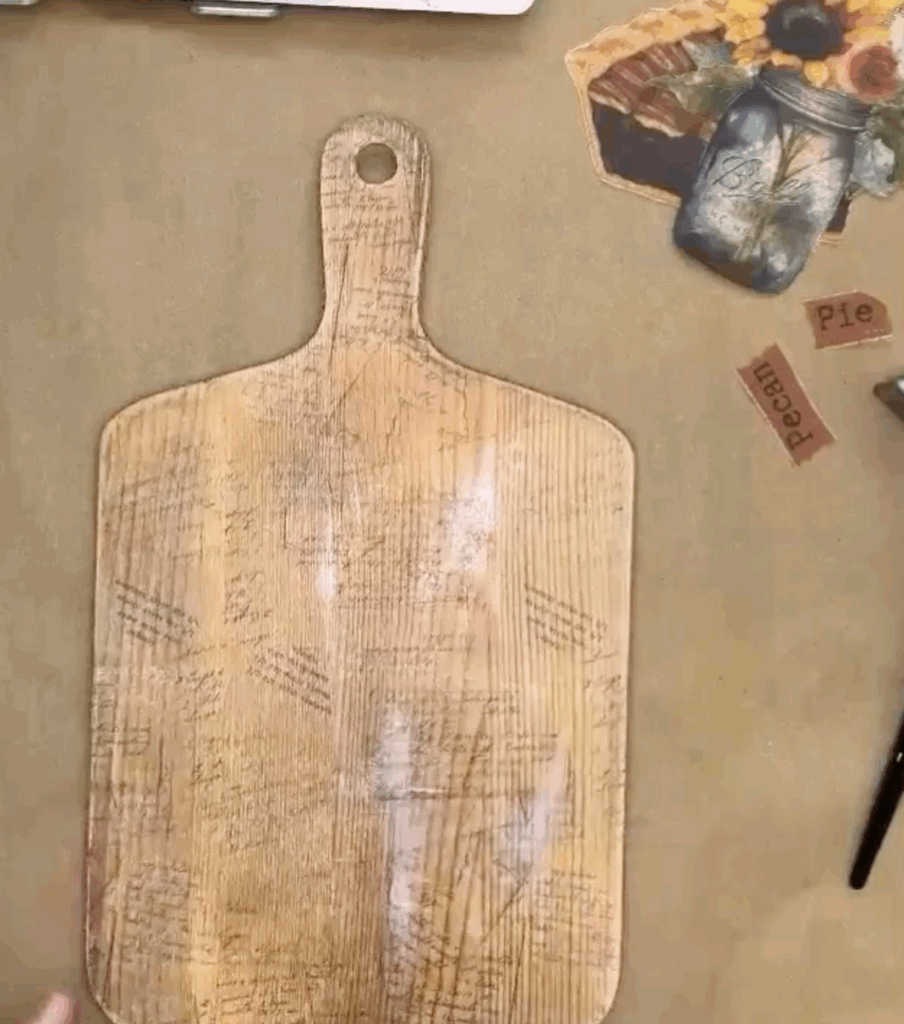
Step 3: Choose and Cut Your Napkin Designs
Now it’s time to prepare your focal images – the pie, the floral jar, and the sunflower. You’ll have four different pie napkins in your kit: pumpkin, cherry, apple, and pecan. I used pumpkin for my original sample, but for the tutorial, I chose the pecan pie design. Pick whichever pie slice represents your favorite fall flavor or fits best with your other décor.
Using small detail scissors, cut around your chosen pie slice and its matching word label. Don’t worry about cutting precisely along the edges; instead, use a “bubble cut” technique, trimming loosely around the design and leaving a soft edge of the background. Repeat this process for the ball jar bouquet napkin and the sunflower napkin. For the sunflower, you’ll want to prune off most of the stem so the flower and leaves don’t cover too much of your recipe card background.
When cutting, leave the napkin plies together, it’s easier to cut through a thicker layer without tearing. Once all your shapes are cut, gently separate the plies and keep only the top printed layer. Set your pieces aside for the next step.
Step 4: Layer Your Focal Images
Lay out all your cut napkin pieces on the board before you glue anything down. Once you’re happy with the placement, use a Frixion Pen to lightly trace any overlapping areas, such as the part of the pie crust that rests over the top of the jar. You’ll cut along this traced line to create puzzle-like pieces that fit together seamlessly. This prevents darker areas of one napkin from showing through lighter designs on top.
Start by applying Mod Podge to the area where your jar will go, then carefully position and smooth the napkin using a deli sheet. Once that’s dry, add your pie slice and fit it into place along the traced edge. Finish by adhering the sunflower or bouquet, allowing it to overlap slightly for a layered, dimensional look. When all of your images are applied, let the board dry fully before sealing.

Step 5: Seal Your Art
After all of your napkins are adhered, brush another even coat of Mod Podge Matte across the entire surface. This top coat seals your work, giving it a smooth finish and protecting it from moisture. It’s an important step before any pen work or embellishing because it prevents ink from bleeding and helps your pens glide smoothly. Once you’ve applied the coat, set your board aside to dry completely.
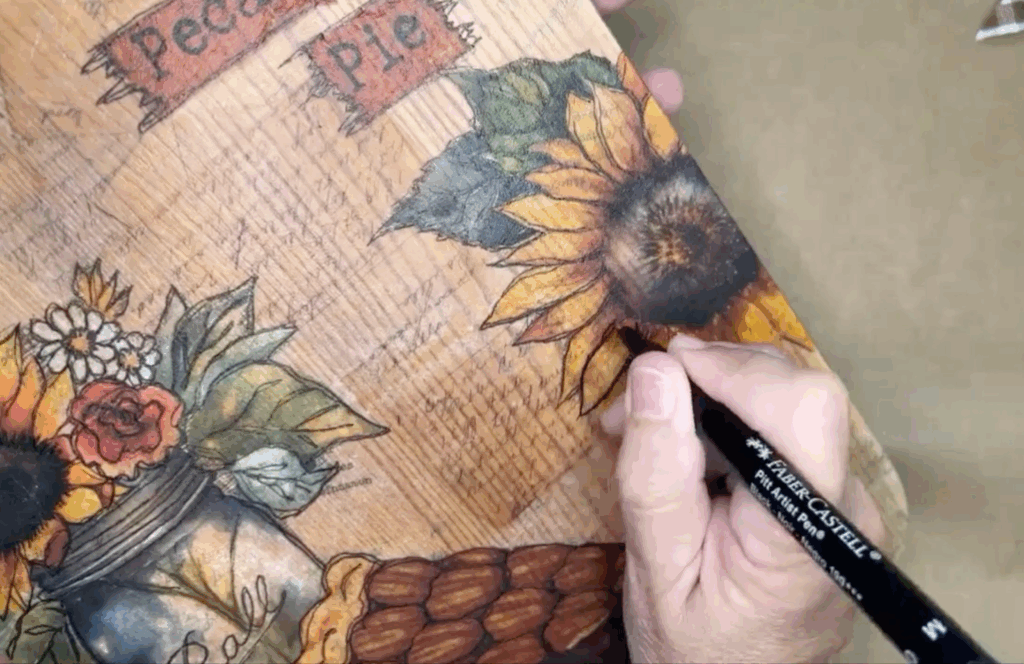
Step 6: Pen Work
When your board is fully dry, it’s time for one of my favorite techniques: pen work. Using Faber-Castell Pitt Pens, you’ll outline and accentuate your designs to make them pop. Choose a medium tip (0.7) pen and start by outlining your sunflower, leaves, jar, and pie.
For the flower centers, add squiggly lines that extend slightly into the petals. For the leaves, draw a central vein and a few side veins. On the jar, trace around the curved edges and the faint thread lines at the top, and gently outline the “Ball” lettering so it stands out. Outline the pie crust and add a few short lines or “ridges” to give it texture.
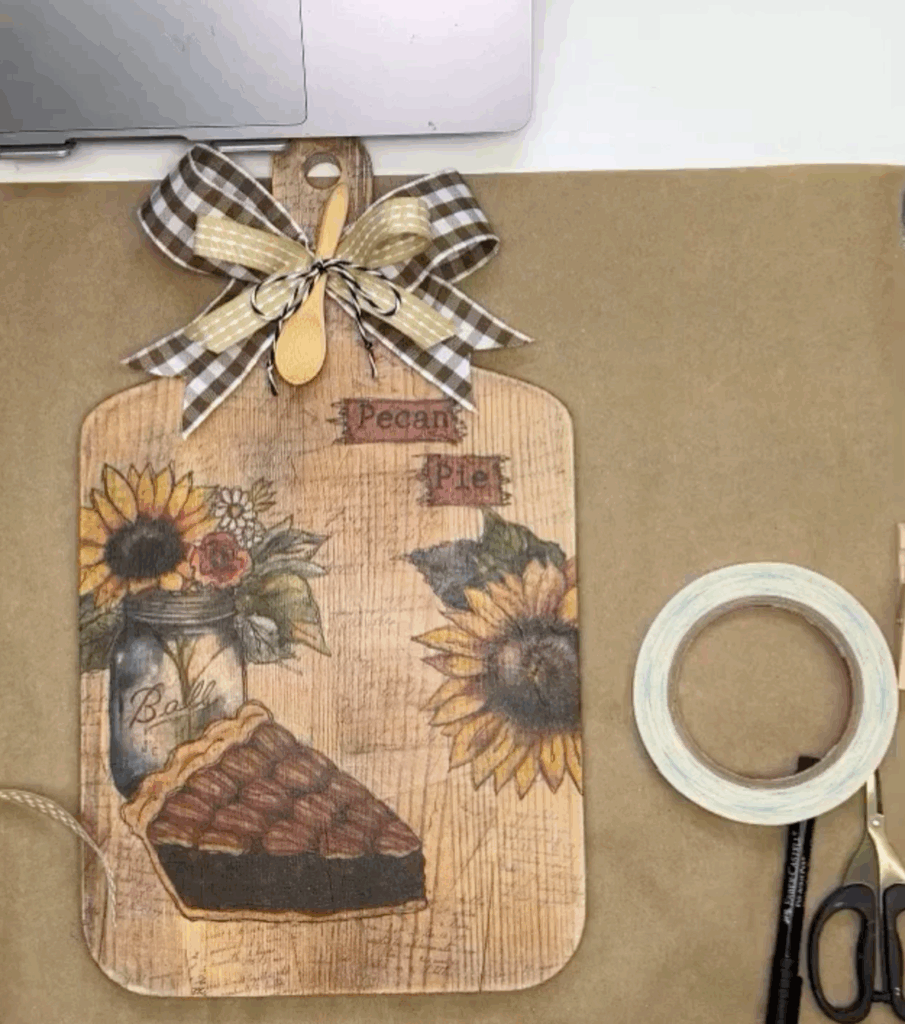
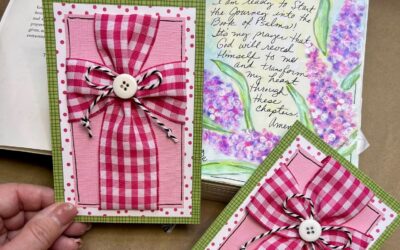
Step 7: Make the Bow and Spoon Embellishment
To create the decorative bow, layer your two ribbons together and tie them with the black and white twine. Start by forming each ribbon into a looped “awareness” or tribute-style shape, pinching the center to create the bow. Use a clothespin to hold it in place while you work. Stack both bows together, secure them tightly with twine, and adjust the loops and tails until you’re happy with the shape. Trim the ends into “V” shapes (flag ends) by cutting a small slit in the center and snipping diagonally toward it.
Once your bow is ready, hot glue the small wooden spoon at an angle across the center. Add a simple twine bow around the spoon handle for extra charm. If you’d like the loops to stay in place, add a few small dots of hot glue between the ribbon layers.
Step 8: Attach the Bow
To attach the bow in a removable way, use Scor-Tape – a double-sided crafter’s tape that holds firmly but peels away easily when it’s time to flip the board to the Christmas side. Tear three short strips and press them horizontally across the top of your board. Press the bow firmly in place with your thumbs inside the loops to secure it. You can add a few small dots of glue between loops if you want the ribbons to hold their shape even better. When it’s time to change seasons, the bow will peel right off, and any leftover tape can be rubbed away cleanly.
Step 9: Add Optional Ribbon Detail
You’ll likely have extra of the caramel-colored stitched ribbon from your kit, and it looks lovely as a border along the bottom of your board. If you’d like to add this accent, brush a thin line of Mod Podge along the bottom edge and press the ribbon in place. Don’t coat the top of the ribbon, just secure it underneath. Trim the ends neatly along the edges of your board, then use a small amount of Mod Podge on the raw ends to prevent fraying. Once dry, this little detail adds a nice finishing touch to your design.
Step 10: Finishing Touches
If you’d like to add a little shimmer, use Stickles glitter glue to highlight the whipped cream on your pie, the white flowers, or any small details. Once everything is fully dry, reattach your leather hanger if you plan to hang your piece, or display your board upright on an easel.
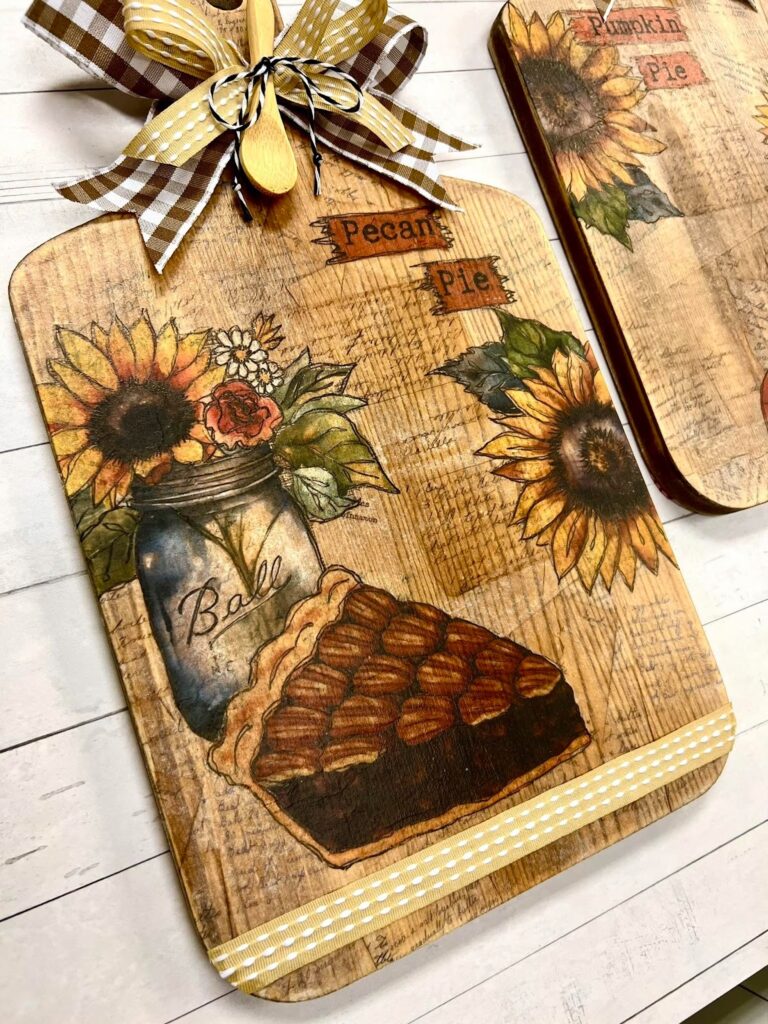
Your finished Fall Cutting Board is a beautiful blend of cozy charm and handmade detail. Between the layered recipe cards, the sunny florals, and the slice of pie, it captures everything we love about the season. Each one will turn out a little differently depending on your chosen napkins and layout, making it uniquely yours.
Part 2: Christmas Side of the Reversible Cutting Board
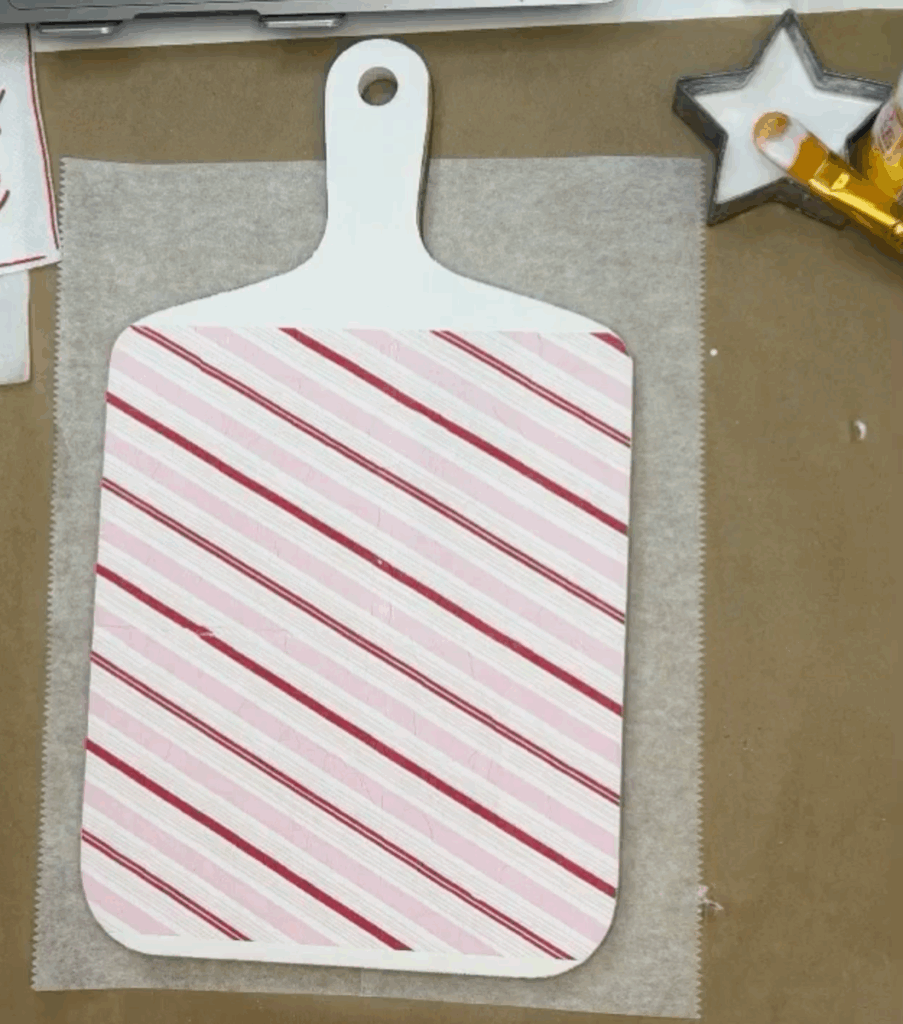
Step 1: Prep the Board
If you’ve already finished your fall side, simply flip your cutting board over to the blank side. This clean surface will become the Christmas design. Make sure it’s dust-free and smooth before you begin. If you haven’t removed the leather hanger yet, go ahead and take it off so it doesn’t get in the way while you work. Set it aside for later — we’ll reattach it when both sides are finished. Paint the entire front of the cutting board white with Simplicity Country Chic Chalk Paint. Let dry before moving on.
Step 2: Lay Out Your Napkin Designs
Before applying any Mod Podge, take a few minutes to plan your layout. You’ll be using a variety of Christmas napkin images for this collage-style design. The main napkins include gingerbread cookies, striped peppermint ribbons, and colorful candies.
Begin by cutting out the main images you want to use. You can use detail scissors or simply tear the napkins for a softer, more organic edge. It’s often easier to cut through all three plies of the napkin and separate them afterward. Each napkin is three-ply, so remember to remove the two white back layers before gluing down your printed pieces. Once you have your shapes ready, start arranging them on the board.
Step 3: Apply Your Background Layer
You’ll start Mod Podging with the largest napkin pieces first, typically the gingerbread and candy background napkin. Apply a generous coat of Mod Podge Matte directly onto your cutting board using a brush. Be sure to cover the surface evenly, but don’t overwork it. Place your napkin carefully onto the wet Mod Podge, then smooth it out gently using a sheet of plastic deli wrap. Start at the center and move outward to push out any air bubbles or wrinkles.
Work in sections if needed – it’s easier to control your napkin placement that way. You can slightly overlap napkin pieces so the seams blend naturally. Once your background napkin is in place, use a heat tool on a low setting or let it air dry for a few minutes before trimming the edges. Sand gently around the border to remove any excess napkin tissue.
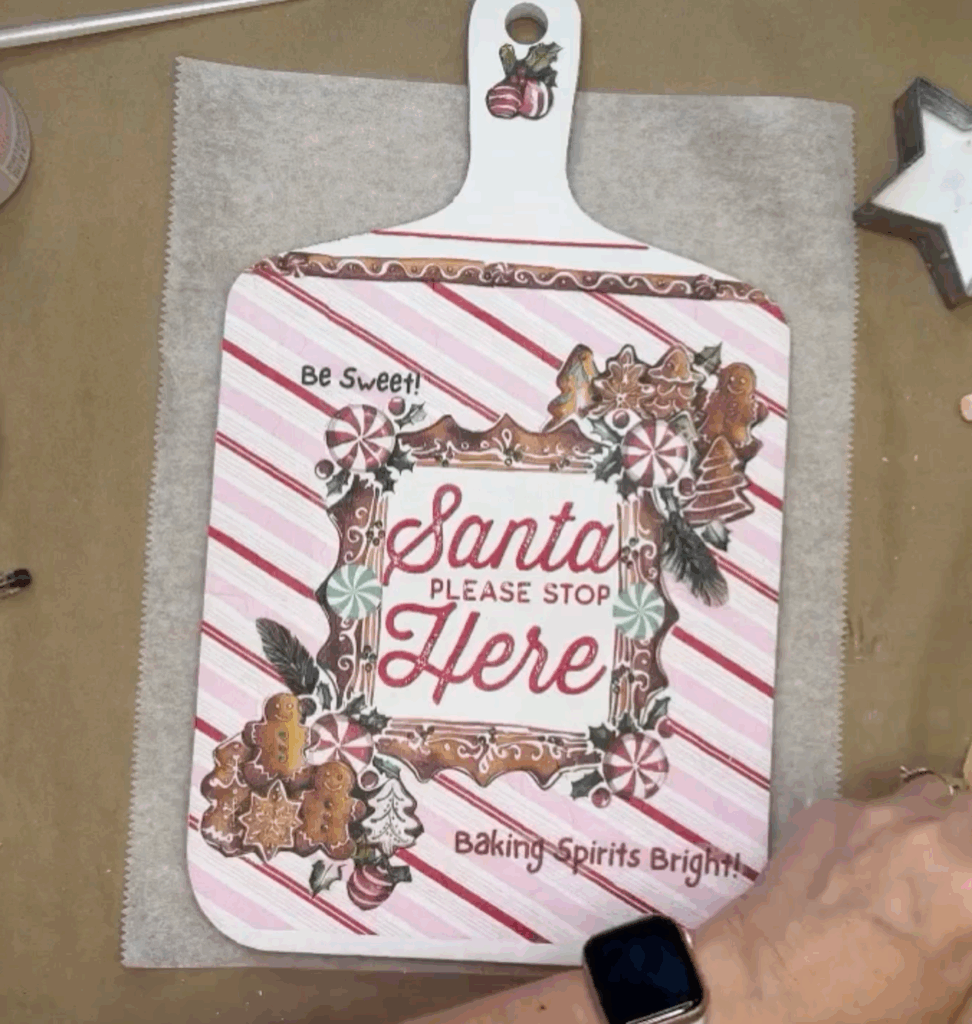
Step 4: Add Focal Napkin Layers
Now comes the fun part — adding your detailed napkin pieces like cookies, candies, and ribbons. You can use any combination that speaks to you! In my version, I layered a gingerbread cookie in the lower section, the “Santa Please Stop Here” napkin in the middle, and a cluster of chocolate chip cookies on top.
If your napkins overlap, you can use a Frixion pen to trace where one design meets another. Then, paint this area with your white chalk paint again so that your candy-striped background doesn’t show through. Dry with a heat tool.
To adhere each napkin, brush a thin layer of Mod Podge onto the area of the board where it will go. Carefully lay the napkin in place and use a plastic deli sheet to smooth it out. Repeat this for each piece, working from back to front in layers.
Once everything is placed, let it dry completely before adding any additional accents. You can also add a thin coat of Mod Podge over the entire surface when finished to seal it.
Step 5: Add Pen Work
Once your Mod Podge is dry, it’s time to bring your design to life with some pen detailing. Using a Faber-Castell Pitt Pen, outline the edges of your cookies, candies, and ribbons. Move your hand quickly for a loose, whimsical look rather than trying to draw perfect lines.
Step 6: Add Ribbon Detail
You’ll use the red gingham ribbon from your kit to add a festive border along the bottom of your board. Brush a narrow line of Mod Podge across the bottom edge, then press the ribbon into place. Don’t cover the top with Mod Podge; just secure it underneath. Trim the edges neatly and use a tiny dab of Mod Podge on the ends to prevent fraying.
Step 7: Create and Attach the Bow
Now for the finishing touch, the bow! Just like in the Fall Side project, you’ll create a layered bow using your two ribbons and black-and-white twine. Start by crossing each ribbon in a loop shape and pinching the center. Stack the ribbons and secure them tightly with twine. Fluff the loops and trim the tails into a “V” shape for a polished look.
Hot glue the small wooden spoon across the center of the bow, or tie it on with twine if you want it to stay removable. Once your bow is assembled, attach it to the top of the cutting board using Scor-tape so you can easily remove it when you flip your board back to the fall side. Scor-tape holds well but rubs off cleanly when you need to switch seasons.
Step 8: Add Sparkle and Dimension
To give your Christmas board some extra festive sparkle, Miss Tracy used Stickles glitter glue and Glossy Accents. Add Stickles to the edges of cookies, candy centers, or anywhere you want a dusting of shimmer. Use Glossy Accents to create raised, shiny spots that mimic the look of icing or glossy candy glaze. You can also add a bit of shimmer around your bow or ribbon to catch the light. Once everything is dry, your board will have a beautiful, dimensional finish.
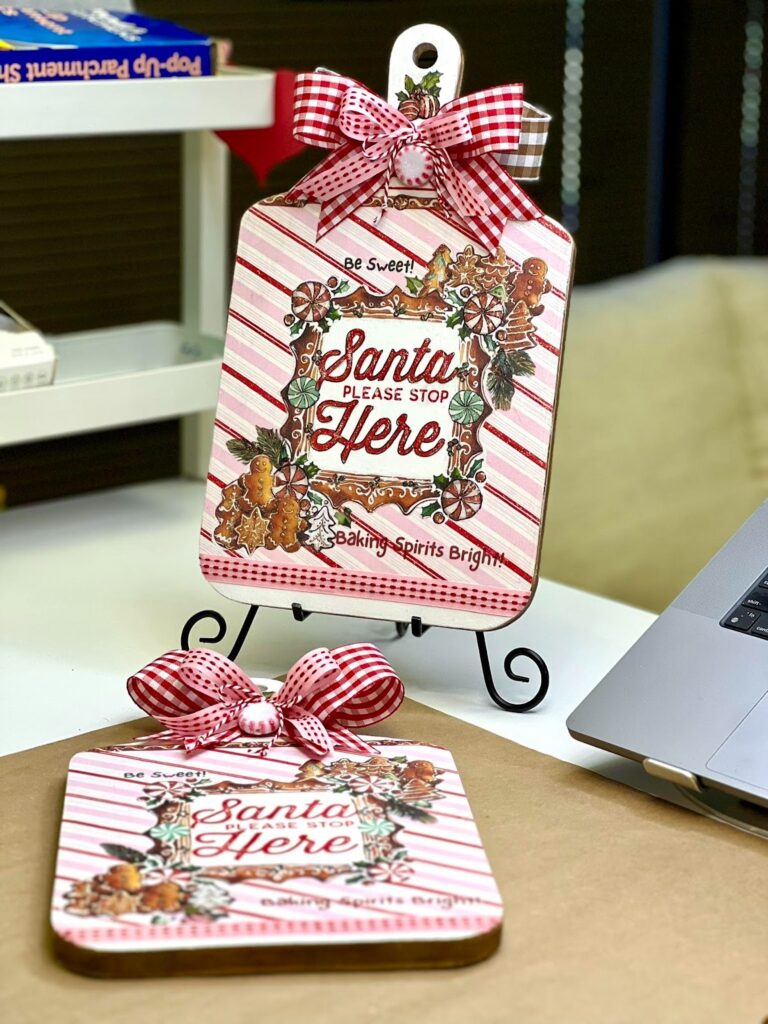
Step 10: Finishing and Display
When the board is fully dry, reattach the leather hanger if you’d like to hang your piece, or display it upright on an easel or kitchen shelf. The reversible design makes it easy to rotate from fall to Christmas without storing multiple decor pieces — simply flip it over when the seasons change!
Want More Holiday Creativity?
If you enjoyed this project, you’ll love what’s coming next in the Napkin Club! Members get access to exclusive napkin designs, monthly projects, and creative tutorials that use napkin art in new and exciting ways. Each month features new inspiration, live sessions, and beautiful printable downloads that help you make the most of your stash. Click here to learn more!


I am so thrilled to find your workshops. I have been creative all my life. My jobs have always been creative. Now recently retired I am ready to begin a new chapter. My goal is to have a theme and all items I create will be coordinated within the theme. The purpose is so they can be merchandised cohesively as a draw to my booth in a coop or a seasonal bazaar table. Your techniques are very helpful.