


Supply List:
- Bunny Rabbit Kit – Kit includes two wooden bunny heads and one full napkin with four images
- Mod Podge Matte
- Crystal Stickles
- Pitt Pen
- Hot Glue Gun, Ribbon, and Flowers
This Easter-themed craft is fun to create as an adult, or with your children or grandchildren for a holiday activity. Either way, this is very easy and great for all ages! Grab our bunny kit, which includes two wooden bunny heads and a full napkin with four images, and you can easily pull this together. (If you’re in my Napkin Club, you have this napkin!) I’ll show you step-by-step how to create this, how to add the embellishments, and how to decorate with these!
Start by painting the bunnies white. You can use chalk paint, acrylic paint, whatever you have. Let dry or dry with a heat gun.
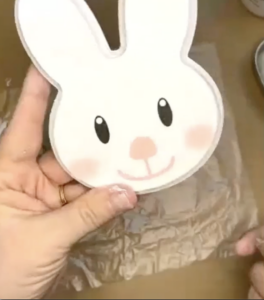
Next, take your napkin and cut out two bunnies. The napkin bunnies are slightly bigger than our wooden bunnies, so we are just going to cut off the ears. Then, take the ears and cut out the pink part of the ear. Take that pink inner ear and lay it on top of the wooden bunny to see how long it should be, make a mark and trim it.
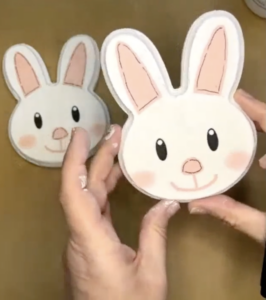
Then, remove those plys of the napkin until you have the top image. Add a layer of Mod Podge Matte to your wooden bunnies. Take your bunny face and apply it to your wood using a plastic sheet over top to smooth it out. Do the same for your second bunny. Let dry or dry with a heat gun. Then, take sand paper and just sand off those hanging edges.
Add some more Mod Podge Matte to the wooden bunny ears, lay the napkin ears on top, and smooth it down with your plastic wrap. Do the same for your second bunny.
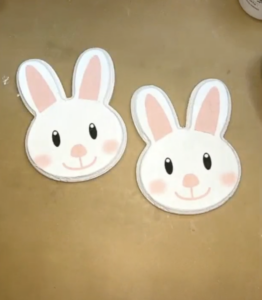
Add a thin coat of Mod Podge Matte to your bunnies to seal and protect your napkins. Let dry or dry with a heat gun.
Now we’ll do some pen work with a Pitt Pen. I’ll add some broken lines to outline my ears and nose.
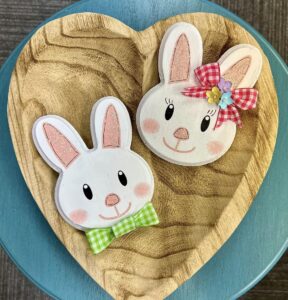
Adding Embellishments to Your Wooden Bunnies
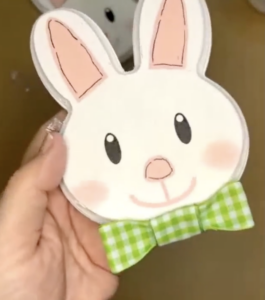
Let’s add some embellishments! I am creating a boy bunny and a girl bunny. I have this adorable pink and green gingham checked ribbon from Hobby Lobby that I’ll be using. Use whatever you have in your stash!
I’ll be adding a green bowtie to my boy bunny. Cut a piece of ribbon 7 inches long and make it into loop. Then, cut another piece that is 4 inches long and wrap it around the middle of your larger ribbon loop. Hot glue it together and then hot glue it to your bunny.
For my girl bunny, I’m going to make another bow with the pink ribbon. For this one, you could just create a regular tied bow, cut the flag ends, and hot glue to your bunny’s ear. I’m going to add a little cluster of flowers to the bow’s middle. I’ll also add some cute little eyelashes with my Pitt Pen.
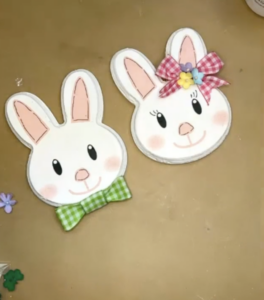
Let’s add some sparkles with Crystal Stickles! You can apply this with a brush or the tip of the stickles. I’m going to add some to the pink of their ears, nose, cheeks, and mouth to make it sparkle.
How to Decorate with Your Wooden Bunny Crafts
My first idea is to add two ceramic magnets to the back of the wooden bunnies. Then, you can add them to any magnetic surface, like the fridge or a metal frame. Another idea is sticking them to a galvanized bucket that could be a little Easter gift or a planter.
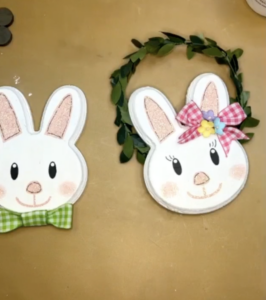
My other idea is to make them into small hanging signs. I would use something like green garland that is wired, so you can bend it. You could just hot glue it to your wooden bunny and then have it as spring decor.
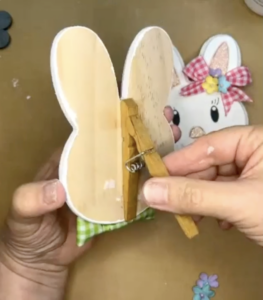
My last idea is to use the clothespin hack to have them stand up. You just pop the one side of the clothespin back to create a little easel. You can then glue it to the back of your bunny and have it displayed.
The options are endless with these little bunnies! This is a fun Easter craft activity for just you or the kids and grandkids. Customize and embelllish them any you would like and then decorate with them in tons of different ways!
Grab the kit so you can create this napkin art piece yourself! Each kit includes two wooden bunny heads and one full napkin with four images.
I go LIVE on my Facebook page every Friday at 11 am CST for a fun and easy Craft-n-Chat Session. Come learn something new while creating something beautiful!


0 Comments