


Supply List:
- Count Your Blessings DIY Decor Kit
- Krylon Gold Leaf Pen
- Black Pitt Pens
- Liquid Antiquing Wax
- Mod Podge Matte
- Brown Chalk Ink
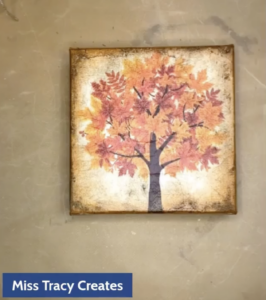
This project is near and dear to my heart because I fell in love with this beautiful fall tree napkin and it just inspired me to count my blessings. We all have so many things to be thankful for and it’s a great time of the year to remember and reflect on that.
This project turned out so elegant with stunning gold accents and antiquing details. This would be the perfect addition to your fall decor or even a gift to show someone you are thankful for them. The back of this canvas also has a pocket where you can put pictures of your blessings or handwritten tags with things you or your guests are thankful for.

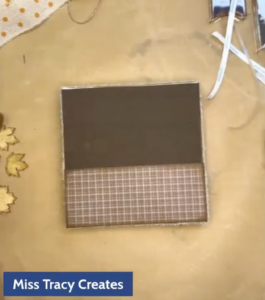
Your Count Your Blessings DIY Decor Kit will contain the following items: Blessings Tree napkin, 6×6 chunky canvas, embellishment bag with ribbons & trims, faux leaves, wood leaves, one acorn, and 2 pieces of cut cardstock – 6×6 solid and a 6×2.5 pattern for the back pocket.
Applying Napkin Art to Your Canvas
Start by separating the plys of your napkin until you have the top layer of napkin art. Then, apply a coat of Mod Podge Matte to your canvas. Lay your napkin on top and use a sheet of plastic wrap to smooth it down with your hands. Dry with a heat tool. Then, take a small piece of sandpaper and sand off any napkin edges that you have hanging off of your canvas. Finally, add another coat of Mod Podge Matte to your canvas to seal your artwork.
Antiquing your Art Project
If you’d like to give your napkin art some more depth and warmth, antiquing is a great option! I am using Liquid Antiquing Wax and applying it to my canvas with a paintbrush. (Don’t freak out at this part because you will be wiping it off!) Take a baby wipe and start washing it in a circular motion. You can also do this to the sides of your canvas as well. Dry with a heat tool.
Next, take Brown Chalk Ink and apply the ink pad directly to the corners and edges of your canvas to create even more of an antique look. Let dry.
Adding Details and Embellishments to Your Canvas
In your kit, you will have a handful of small wooden leaves, which we are going to make extra beautiful! I’m going to use a Krylon Gold Leaf Pen to paint them gold. You will have an acorn in your kit, which I will also color with my gold leaf pen. Let these dry. I’m also going to add some brown chalk ink around the edges of my wooden leaves.
Let’s add the pocket to the back of the canvas. You will have two pieces of cardstock in your kit – grab the 6×6 piece and trim it just a hair smaller. Then, add ScorTape around the edges of your cardstock and stick it to the back. Then, add your other piece of cardstock using the same technique to create a pocket. If you have your chalk ink pad, you can ink the edges of your paper too!
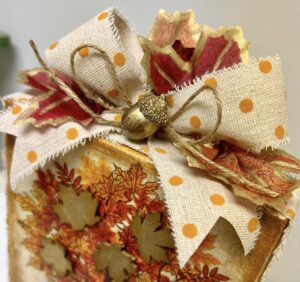
In your kit, you will have a little piece of checkered ribbon, jute twine, and a thick polka-dotted frayed ribbon. Add hot glue to the edges of your canvas and wrap the polka-dotted ribbon around the entire canvas.
Take the remainder of your polka-dotted ribbon and your jute twine to make a bow. Hot glue that to the top of your canvas. You also have some faux leaves in your kit – I will outline each leaf with my gold paint pen and draw those detailed veins on the leaf. Add a line of hot glue to the bottom of each leaf and smush that bottom together to give your leaf more dimension. Then, hot glue each leaf to the top of your canvas around your bow. You can also take your checkered ribbon and create another bow for the back of your canvas and run it along your pocket too. Finally, hot glue your acorn right in the center of the top of your canvas and hot glue your wooden leaves to your tree as well.
At this point, you can use your Black Pitt Pens to draw on some detail lines to your leaves.
Now you have a beautiful piece of fall decor that you can display in your home for years to come! You can simply use this as a shelf sitter or you can use candlestick holders to balance your canvas on top of and display on a mantle or shelf.

I go LIVE on my Facebook page every Friday at 11 am CST for a fun and easy Craft-n-Chat Session. Come learn something new while creating something beautiful!
If you loved this project, join the waitlist for The Napkin Club where Unique Makers can connect, learn, and be inspired to create with the Individual Unique Napkin Collections that you will receive every month! A place where Napkin Lovers can unite and be inspired!


0 Comments