Supply List:
- Winter Shadowbox DIY Decor Kit
- Country Chic Paint – Hollow Hill Green
- Country Chic Paint – Crackle Medium
- Country Chic Paint – Simplicity White
- Country Chic Paint – Sunday Tea
- Mod Podge Matte
- Diamond Stickles
- Foam Tape or Pop Dots
- Snip Scissors *your favorite detailed scissors will work great!
- A Black Detail Pen – I like the Faber Castell Pitt Pens
- Hot Glue – found in my Amazon shop
- Plastic Wrap – found in my Amazon shop
- Heat Tool
Winter is the perfect time to embrace cozy creativity, and this DIY Winter Shadowbox Decor Kit has everything you need to craft a charming seasonal masterpiece. From painting techniques and napkin art to layering adorable embellishments, this project combines fun details and festive flair to brighten your home.
Your kit will include: 1 – 8×8 wooden shadowbox, 1 – shiplap shape snowman, 4 seasonal napkins, small wood blocks for risers, little fabric and felt pieces for your snowman, 1 sheet of white cardstock paper, the cutest little resin snowflakes, red & white twine, and 2 little black button eyes.
Prepping Your Winter Shadowbox
We’ll begin by creating napkin art pieces to layer inside the shadowbox using the “iron-on method.” Lay down a sheet of parchment paper and place a piece of white cardstock on top. Apply a coat of Mod Podge Matte to the cardstock with a paintbrush and set it aside to dry.
Now, paint your wooden shadowbox with Country Chic Paint – Hollow Hill Green. You’ll be painting the back, edges, and front of the edges. Next, you’ll paint the inside of your shadowbox with Country Chic Paint – Simplicity White. You could also dry brush some white paint onto the green for some texture. Dry with a heat tool. Once dry, lightly buff and distress the surface with a foam sander.
Painting the Shiplap Snowman
Next, grab the wooden snowman from your kit. We’ll create a crackled finish using two paint colors and crackle medium, so the base coat will show through the cracks for a rustic effect!
First, paint the pumpkin with Country Chic Paint – Sunday Tea and dry it with a heat tool. Stir (don’t shake) the Crackle Medium by Country Chic Paint, then apply it evenly with a brush and dry again. Now, paint a top coat of Country Chic Paint – Simplicity White, applying in a single direction without overlapping strokes. If you lift the brush, simply flip it and continue. Let it dry and self-level, and watch the crackling effect appear! Let dry.
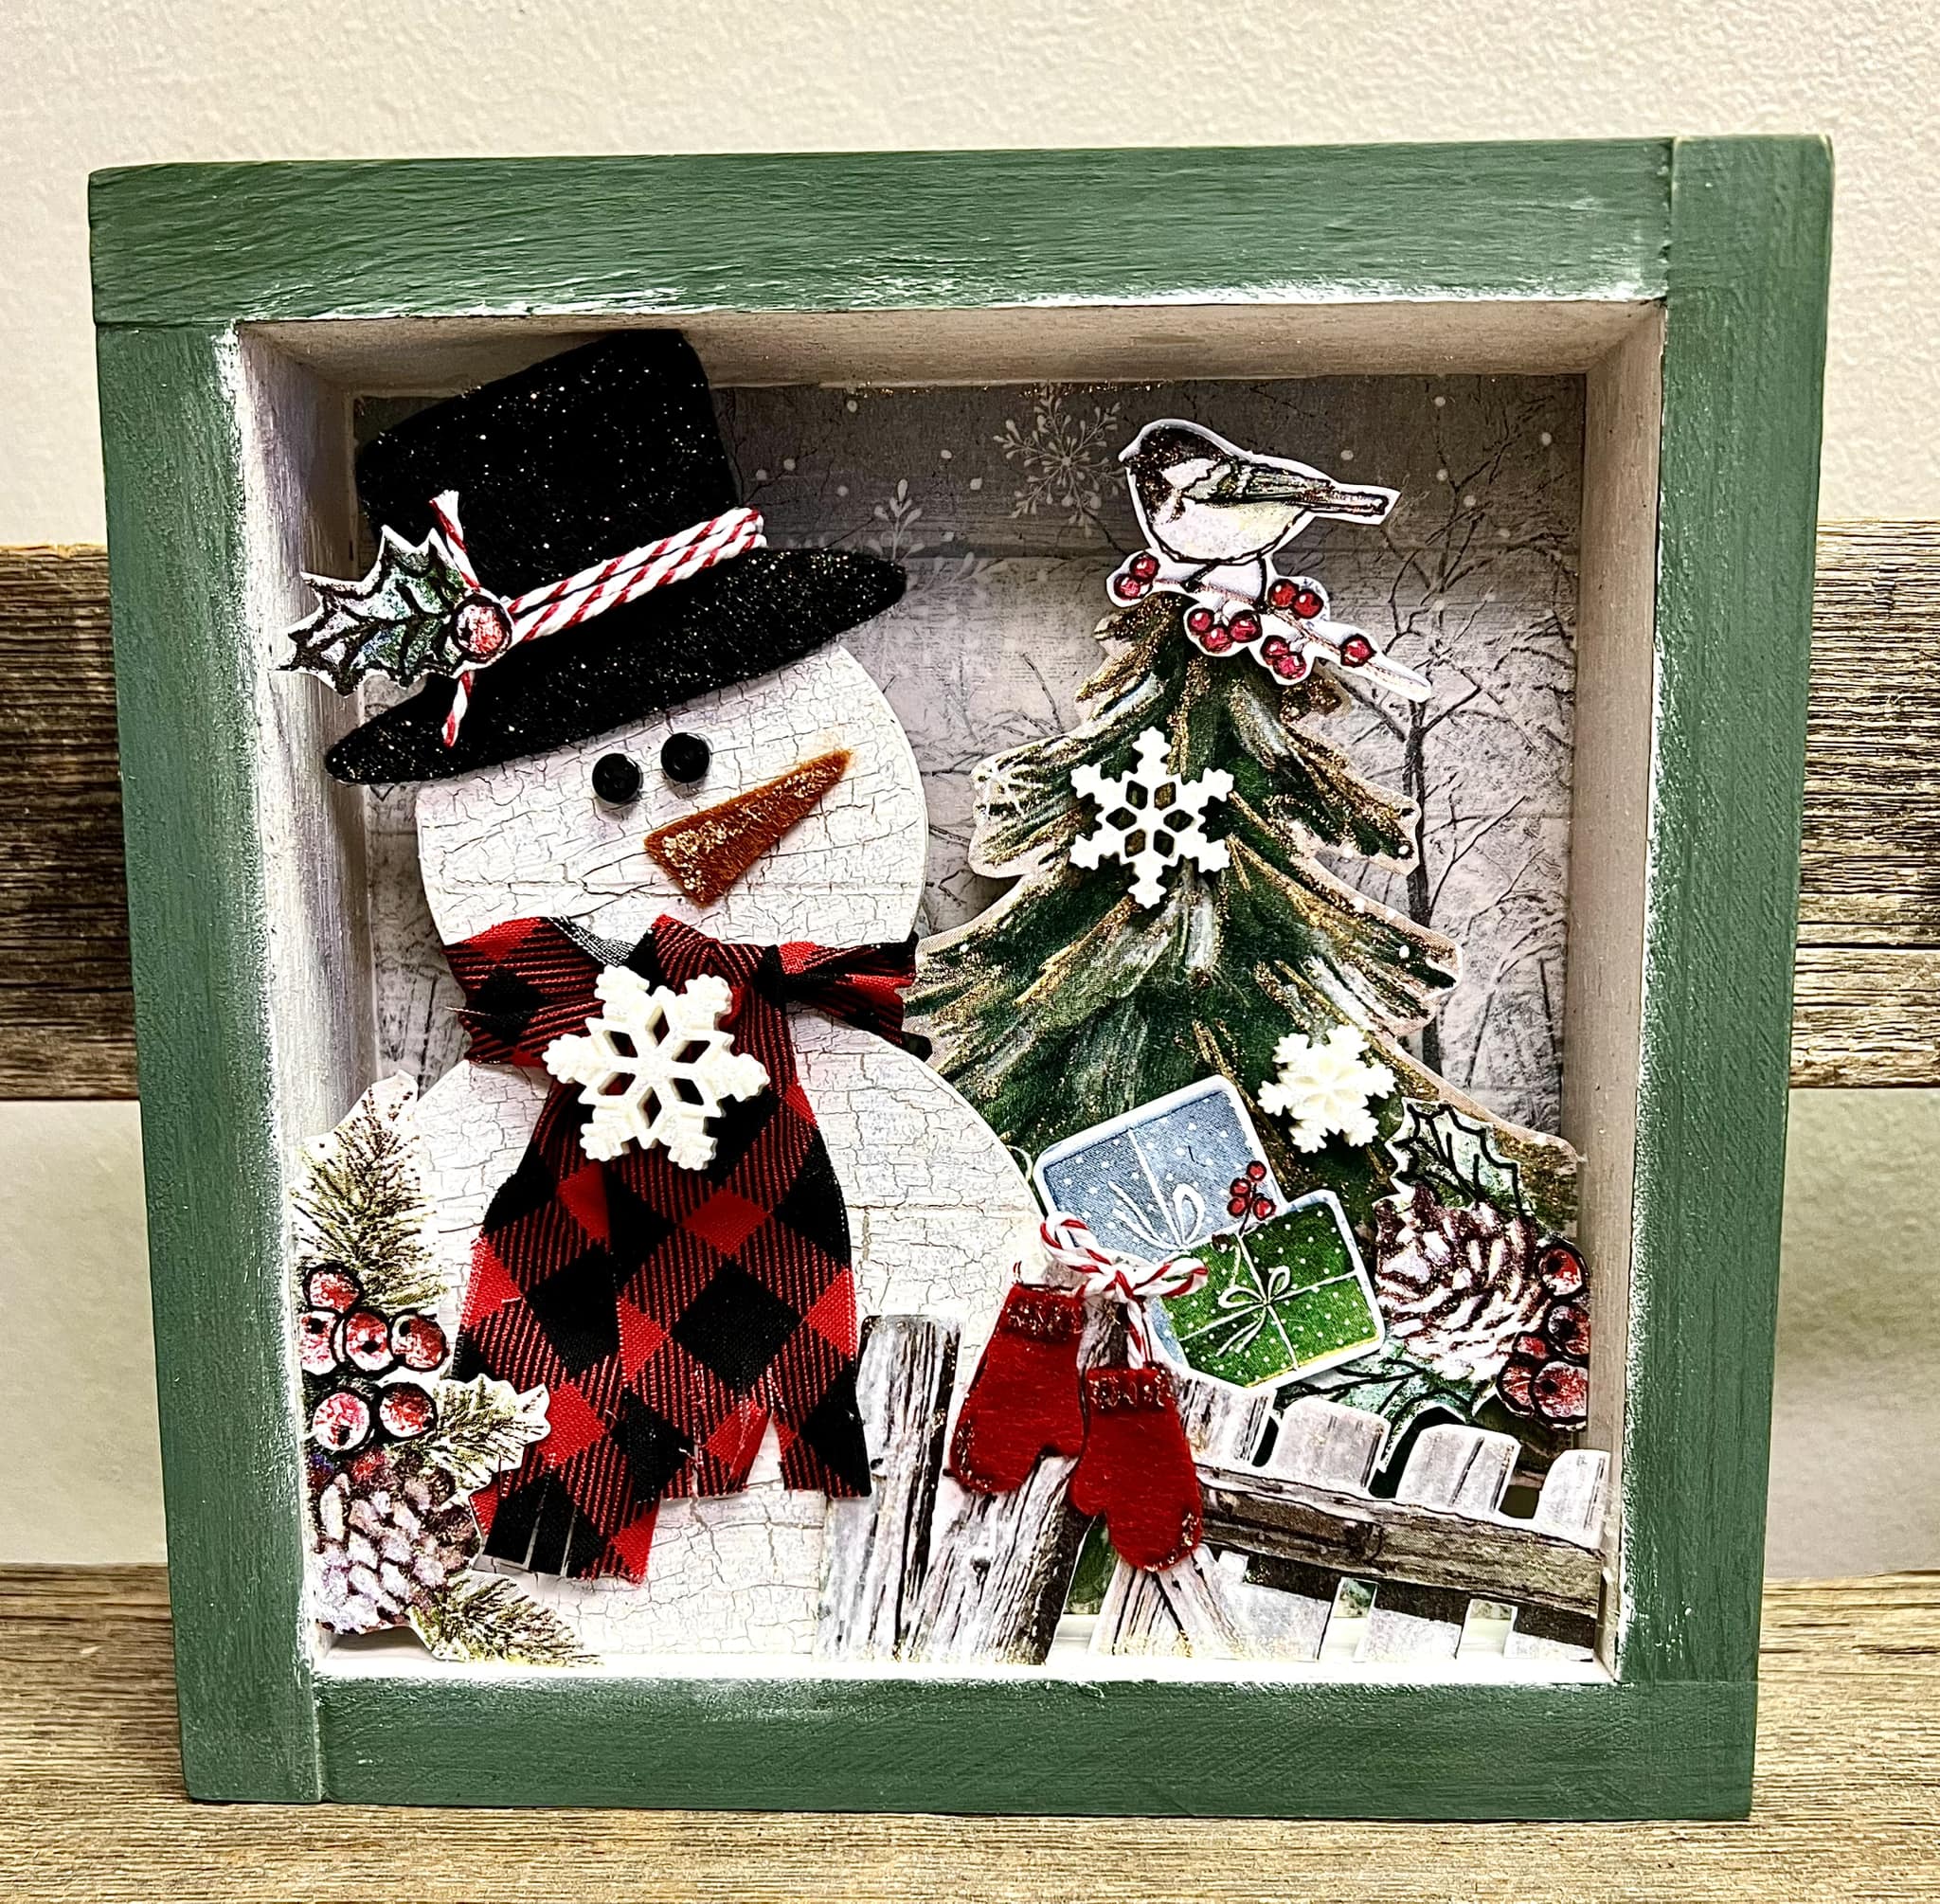
Gather all the snowman elements from your kit and let’s bring him to life! Start by cutting the black felt to fit the size of the snowman’s hat, then hot glue it securely in place. Next, grab the plaid fabric for the scarf, run a few lines of hot glue down the center, and fold the fabric in on itself to make wrapping it around the neck easier. Wrap it snugly around the neck, tie a knot, and use a dab of hot glue to hold it in place. Trim the ends of the scarf and cut fringe for a finished look. Take the included twine, glue one end to the back of the hat, and wrap it three times around to create a ribbon detail. For the face, cut a nose from the rust-colored felt and glue it in place, then attach the black buttons as eyes to complete your snowman’s charming look.
Creating Napkin Art Pieces for Your Shadowbox
Take your dried piece of white cardstock, and let’s continue creating the napkin art pieces for the shadowbox.
Start by cutting out a few images from the napkins in your kit. I’ll be cutting out the frosty pinecones, an evergreen tree, bird, fence with mittens, and presents. Separate the plies until you just have the top layer of napkin art. Arrange these pieces on top of your white cardstock.
Place a piece of parchment paper over them, and use a craft iron on high (without steam) to activate the Mod Podge, bonding the napkin art to the cardstock. Once it’s cooled, add a coat of Mod Podge Matte on top to seal it, then dry again.
With small snip scissors, cut out the images you’d like to use in your shadowbox. I’m also going to cut out another pair of mittens from the owl napkin – these mittens will be a template. Take the red felt included in your kit, lay the mitten templates on top, and trace the mittens with a Frixion Pen, and cut the mittens out.
Assembling Your Winter Wooden Shadowbox
Now, let’s apply the background napkin to the shadowbox. Take the owl napkin that has the missing mittens and carefully separate the plies until you have only the top printed layer. Brush a coat of Mod Podge Matte onto the background, center the napkin, and gently smooth it down with plastic wrap and your hands to avoid wrinkles. Dry with a heat tool, then apply a top coat of Mod Podge Matte and dry again.
Let’s start by adding the evergreen tree to your shadowbox! Your kit includes two small wooden blocks, which will give the tree a three-dimensional effect. Hot glue the blocks to the back of the tree, then secure it to the right of the shadowbox with more hot glue.
Take the Jenga block from your kit, laying it skinny-side down in the shadowbox, and hot gluing it to the left side. Attach the snowman on top of the block with hot glue. Place two pieces of foam tape on the back of the bird, then hot glue it to the top of the tree.
Next, grab the frosty pinecones and outline the holly leaves with a Black Detail Pen. Add a piece of foam tape to the back of the holly and hot glue it to the right side of the shadowbox. Use another piece of frosty pinecones, follow the same technique, and place it in the bottom left corner. Add a sprig of holly leaves to the snowman’s hat for a festive touch. Take the gift boxes, add three pieces of foam tape to the back, and arrange them inside the shadowbox. For the fence, attach foam tape to the back, hot glue it to the bottom right corner, and tie a bow with twine to glue at the top of the fence. Finally, glue the felt mittens over the napkin mittens for an extra detail.
To finish, use the three snowflakes in your kit: glue the large snowflake to the snowman’s scarf and the smaller ones to the tree. Then, apply Diamond Stickles generously—because when it comes to this project, the more sparkle, the better!
With just a few simple steps and creative touches, your Winter Shadowbox is complete! This festive project adds a cozy, handmade charm to your holiday decor and makes a delightful conversation piece. Display it proudly in your home or gift it to someone special!
I go LIVE on my Facebook page every Friday at 11 am CST for a fun and easy Craft-n-Chat Session. Come learn something new while creating something beautiful!
Join the waitlist for The Napkin Club where Unique Makers can connect, learn, and be inspired to create with the Individual Unique Napkin Collections that you will receive every month! A place where Napkin Lovers can unite and be inspired!





Love your crafts, Miss Tracy, especially napkin art. Love the shadow box!!