Supply List:
- Patriotic Shadowbox DIY Decor Kit
- Simplicity – Country Chic Paint
- Starstruck – Country Chic Paint
- Paint the Town – Country Chic Paint
- Mod Podge Matte
- Stickles – Diamond
- Pitt Pen – Black Fine-tip
- Foam Tape
- Detail Scissors
- Foam Block Sander
- Hot Glue
- Heat Tool
- Craft Iron
- Parchment Paper
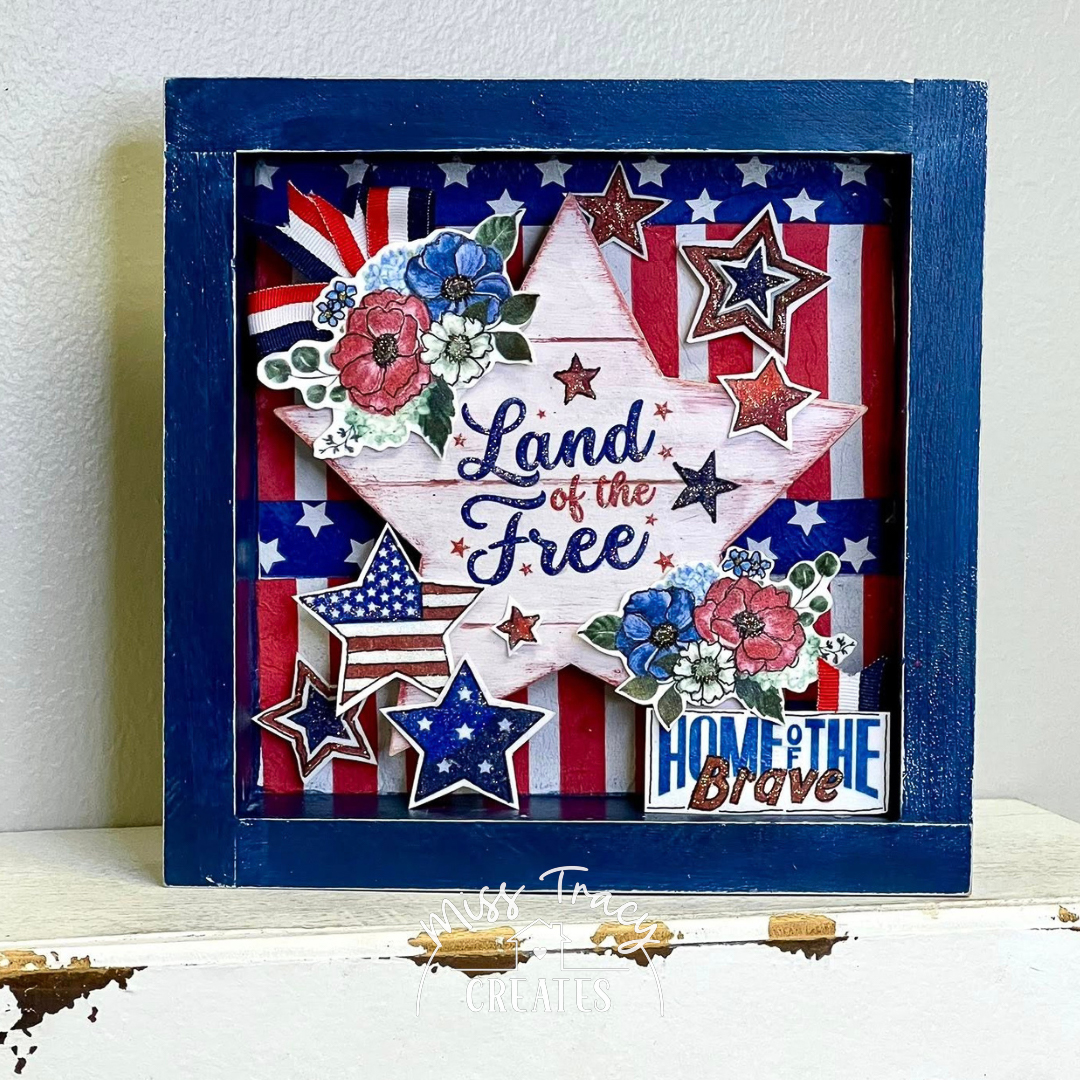
Today, I’m walking you through how to make this layered, sparkly, and perfectly patriotic shadowbox project! Whether you’re crafting for Memorial Day, the 4th of July, or just want to show your American pride this summer season, this red, white, and blue decor piece is full of fun techniques – and best of all, it stands beautifully on its own.
We also have a kit to make this shadowbox project even easier! Your kit will include: 1 – 8×8 Wood Shadowbox, 1 piece of white cardstock, 1 shiplap wooden star, custom patriotic napkins, red/white/blue ribbon, and supportive wooden blocks for dimension.
Step 1: Paint the Shadowbox and Star
I started by painting the entire shadowbox (inside, outside, front, back) solid white using Country Chic Paint in Simplicity. This helps the colors pop and also acts as a primer.
Next, I painted the shiplap wooden star a bright red (I used Paint the Town) and let it dry. After that, I brushed on a coat of white paint over the red and gently cleaned out the valleys of the shiplap to reveal that red underneath. Don’t worry if it’s not perfect – we’re going for a distressed look!
I also painted one of the small wooden cubes blue (the other one doesn’t need paint – it won’t be visible).
Step 2: Add the Blue Distress Layer
Once the shadowbox was dry, I added a quick coat of blue (Star Struck) over the white. After drying, I used two techniques to distress it: sanding with a foam block and “wet distressing” with a baby wipe. This gives that gorgeous, worn denim look – perfect for patriotic vibes!
Step 3: Prep Your Napkin Paper
Time to napkinize! I brushed a full coat of Mod Podge Matte onto the white cardstock and let it dry completely. Once dry, I ironed one of the custom napkin squares onto the cardstock using a dry craft iron and parchment paper. This fuses the tissue to the paper and makes it easy to cut and embellish.
Once it cooled, I sealed the top with another thin coat of Mod Podge and let it dry. Then I used my Pitt Pen to outline some of the flowers and stars for a hand-drawn, whimsical effect. Next, you can cut out elements like flowers and stars to build your 3D collage inside the shadowbox.
Step 4: Add Napkin Art to the Background
I used the other flag-themed napkin to decorate the inside background of the shadowbox. I cut one strip of stars for the top and a strip of red and white stripes for the bottom, then applied them directly using Mod Podge Matte. A chip brush helped me press the tissue into the corners and smooth it out. Once dry, I added a top coat of Mod Podge Matte over the napkin area and let that dry too.
Step 5: Decorate the Star
Using the leftover napkin, I cut out “Land of the Free,” a few stars, and some extra bits. I applied them directly to the painted wooden star using Mod Podge Matte and my deli sheet trick to smooth things out, especially into the valleys. Then I sealed the whole star with another coat of Mod Podge and let it dry.
Step 6: Build the 3D Layers
Now for the fun part – layering! I used hot glue to attach one wooden block inside the shadowbox and glued the star on top, so it appears to “float” in the center.
Next, I attached one of the large flower clusters to the star using foam tape for dimension (a single pop!). I curled the leaves slightly to add to the 3D look.
For the bottom cluster, I glued the second block in the bottom corner and placed the “Home of the Brave” banner on it. I layered another flower cluster over it using double foam tape for extra lift.
I used the rest of the paper stars I had cut out and arranged them diagonally across the box to create a visual flow. I used a mix of single and double foam tape layers to add variation and height. I even stacked two stars for a fun effect.
I also tied a bow with the included patriotic ribbon, flagged the ends, and tucked it behind the top flower cluster for a soft, sweet touch.
Step 7: Add Stickles & Final Touches
I love sparkle, so I used Diamond Stickles to dot the flower centers, trace over letters, and add shimmer to the stars. Even the tiniest stars got a sparkle dot! If needed, you can dab with a fine brush to get into corners or control the application.
Once everything was dry, I gave the entire box (inside and out) a final thin coat of Mod Podge to seal and protect the piece. This gives it a soft satin sheen that looks polished.
This project is such a joyful way to celebrate freedom, honor loved ones who’ve served, and bring creativity into your summer decor.
I go LIVE on my Facebook page every Friday at 11 am CST for a fun and easy Craft-n-Chat Session. Come learn something new while creating something beautiful!
Join the waitlist for The Napkin Club where Unique Makers can connect, learn, and be inspired to create with the Individual Unique Napkin Collections that you will receive every month! A place where Napkin Lovers can unite and be inspired!




0 Comments