


Supply List:
- Hardcover Book
- Craft Knife
- Pen or Pencil
- Craft Scissors
- Orange or Brown Chalk Ink
- Hot Glue/Glue Sticks
- Wine Cork for Stem
- Ribbons, Lace, Twine
- Fall Florals, Leaves, Fake Berries, or Acorns
If you’re looking for a creative and cozy fall craft, let me introduce you to the Book Page Pumpkin! This project has been a fan favorite for years – and for good reason. It’s simple, customizable, and a beautiful way to repurpose old books into adorable fall decor. In fact, the pumpkin I’m showing you today was inspired by one I made over six years ago, and it still looks beautiful every time I pull it out with my autumn decorations!
Whether you’re brand new to crafting or a seasoned maker, this pumpkin project is one you’ll want to add to your seasonal to-do list. Let’s walk through it together!
Step 1: Choose and Prep Your Book
You can make your pumpkin from nearly any old book, but I love using Reader’s Digest books for their decorative covers (which I save for future projects!). You’ll want a book that’s at least 1″ thick. A thicker book will give you a fuller pumpkin, while a thinner one is great for quick crafting sessions or smaller displays.
Once you’ve selected your book, start by removing the cover. Use a craft knife to carefully cut along the inside of the front and back covers, avoiding damage if you plan to repurpose them later. You’ll be left with a glued book block, which will soon become your pumpkin!
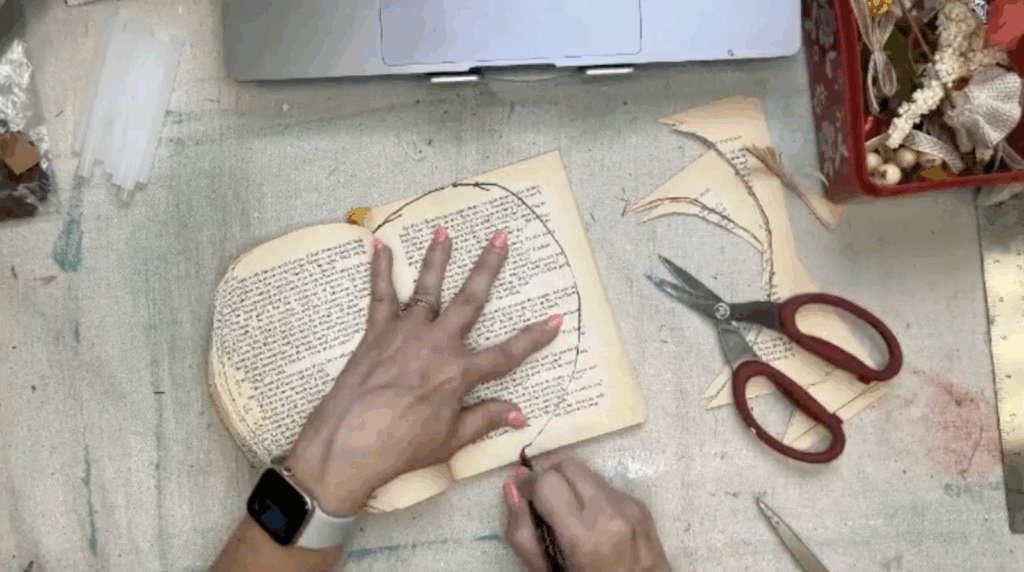
Step 2: Draw and Cut Your Pumpkin Shape
With the cover removed, gently bend the book to loosen the spine. Then, on the top page, sketch out a simple pumpkin silhouette. Keep the bottom of the shape flat so your pumpkin will sit evenly when finished. The top can be rounded with a small dip in the middle – this is where your stem will go.

Next, use sturdy scissors to begin cutting out your pumpkin shape, about 6–10 pages at a time. After each cut, trace the new outline onto the next batch of pages and repeat. This is a repetitive process, but it’s not hard. Remember: this is not a precision craft! A little variation adds to the charm.
Step 3: Glue Pages in Sections
To give your pumpkin structure and shape, you’ll glue pages together in small groups. I recommend gluing together sections of 8–10 pages using a hot glue gun. This helps the pumpkin stay open and gives it stability.
Just apply a thin line of glue down the page edge and press the next page on top. Repeat for each section until most of the book is complete. Leave the final 5 pages unglued—these will act as your connector pages to close the pumpkin into a full circle.
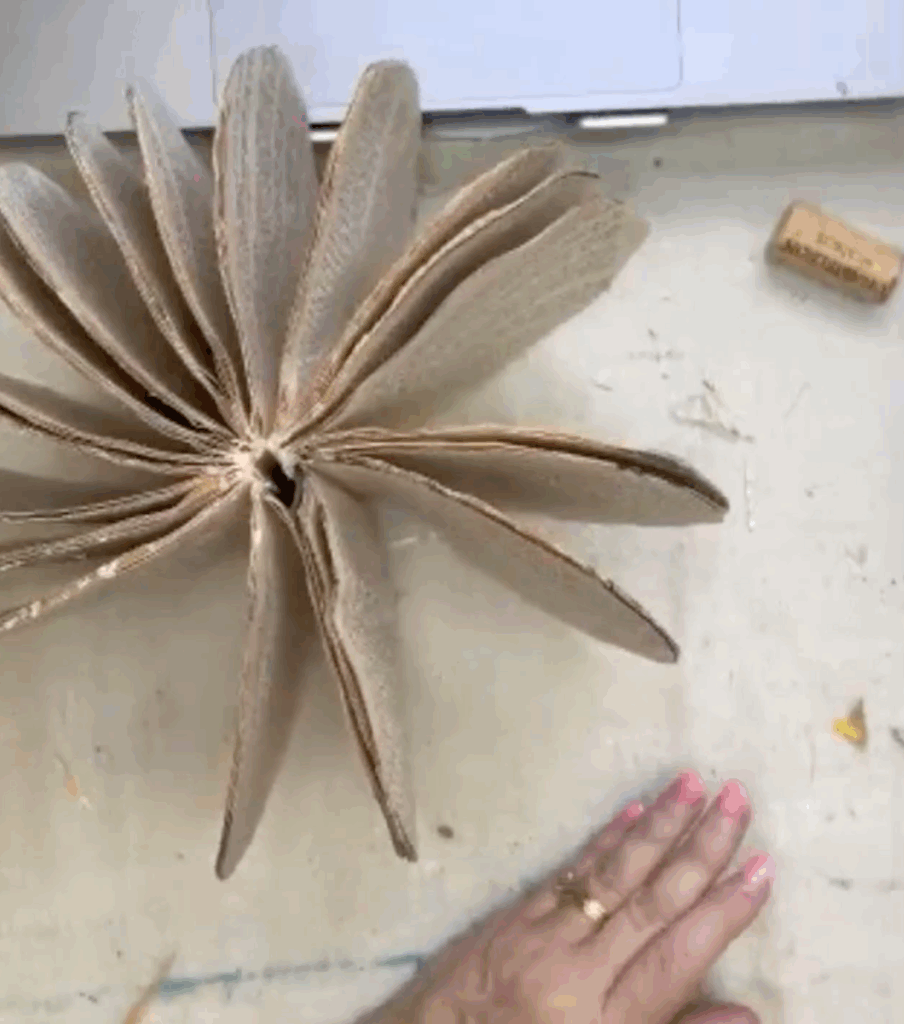
Step 4: Connect the Pumpkin
Once you’ve glued your sections, it’s time to bring your pumpkin to life! Fan out the pages and line up the front and back. Use your final 5 pages to “bridge” the front and back sections, trimming them slightly if needed to make the edges line up. Add a generous amount of hot glue between these last pages and press firmly to secure.
Your pumpkin should now be able to stand and hold its shape!
Step 5: Ink and Distress the Edges (Optional)
To give your pumpkin that cozy, vintage vibe, grab some chalk ink or distress ink in fall tones like orange, rust, or brown. Use a sponge or dauber to gently brush the edges of the book pages.
You can do this before or after assembly – it adds a lovely warmth and helps define the pumpkin’s curves.
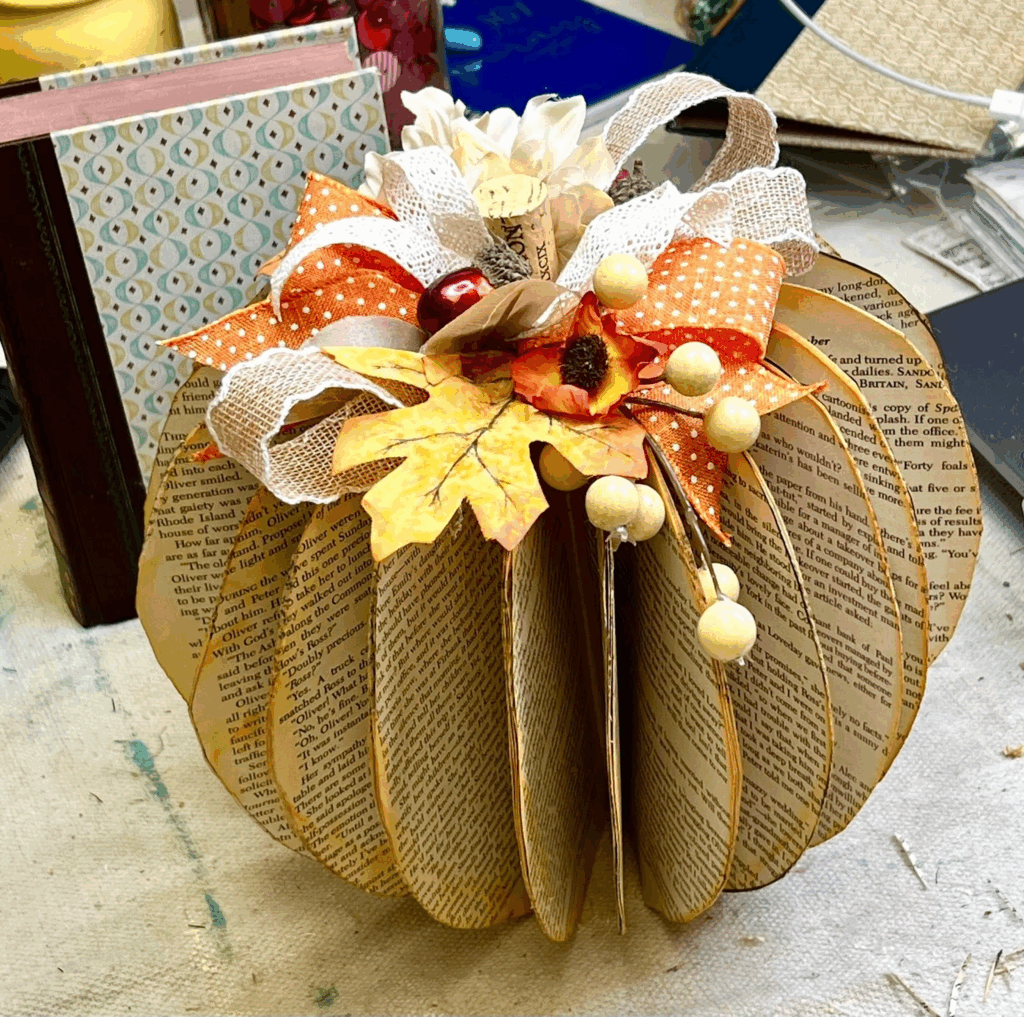
Step 6: Add a Stem and Embellishments
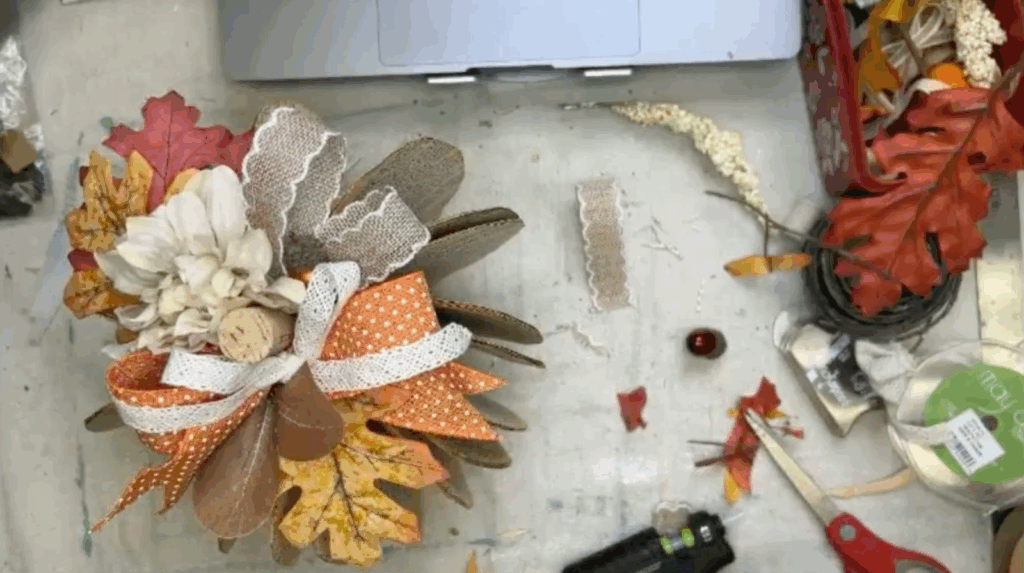
Now for the fun part, decorating the top! Use a wine cork, cinnamon stick, twig, or wooden spool for your stem. Add a big dollop of hot glue and place it into the dip at the top center of your pumpkin.
To finish off your look, tie a wired ribbon into a bow and attach it near the stem. Then tuck in faux leaves, mini flowers, burlap loops, acorns, or berries. Every element you add helps the pages stay fanned out and brings your pumpkin to life!
You can even mix textures with lace ribbon, crochet trim, or bits of fabric from your stash. The more dimension, the better!
Step 7: Fan, Fluff, and Finish
Now it’s time to shape your pumpkin! Gently fan the pages into place and pressing them outward where needed. You can use hot glue behind certain leaves or embellishments to keep stubborn pages in position.
If desired, glue small spacers or beads near the spine at the bottom of the pumpkin to help pages spread evenly.
Once your pumpkin looks the way you like, set it out on display and admire your beautiful, handmade fall decor!

Final Thoughts
This Book Page Pumpkin project is one of my favorite fall crafts – it’s budget-friendly, beginner-friendly, and holds up beautifully year after year. Each pumpkin is unique based on the size of the book, how you cut it, and what embellishments you choose. Whether you’re decorating a cozy corner or making a centerpiece, these charming pumpkins will bring a touch of handmade joy to your space.
Want more cozy, creative projects like this one? Join one of my monthly creative memberships where we make beautiful things together, like napkin art, fabric crafts, seasonal decor, faith journaling, and more! Whether you’re just getting started or looking for fresh inspiration, there’s a place for you inside our creative community. Learn more here!


0 Comments