


Supply List:
- Napkin (from the Faith Napkin Value Pack)
- Clear Gesso
- Watercolors
- Water Brush
- Glaze Pens
- Faber Castell Pitt Pen—Black Fine-tip
- Stickles (Diamond)
- Parchment Paper
- Plastic Deli/Bakery Sheets
- Heat Tool
- Scissors
Today’s project is a special one straight from the heart and the pages of my journaling Bible. In this post, I’m walking you through the entire process of creating a beautiful Bible journaling entry in Psalm 95 using watercolor and napkin art. Whether you’re brand new to Bible journaling or have been doing it for years, this tutorial is meant to inspire and encourage you to creatively connect with the Word of God!

Step 1: Outline the Verse with Watercolors
Watercolors are what I call a “green light” supply – safe to use directly on Bible pages without any prep. I started by slipping parchment paper behind my page, then added watercolor using a water brush filled with water. I chose purple and pink to outline Psalm 95 to make it stand out. The beauty of watercolor is that you can make it as soft or vibrant as you like, just adjust the water-to-paint ratio. Once I was happy with the colors, I let it air dry (or used a heat tool to speed things up!).

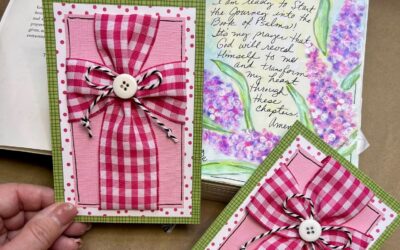
Step 2: Applying Napkin Art to Bible Journal
Next, I applied a thin layer of clear gesso over the entire page. This preps the surface and ensures that future layers don’t bleed through or disturb the previous page. Once dry, I was able to add another layer of watercolor on top, this time focusing on some splotchy areas that would peek through my napkin art later.
Then, I chose a faith-themed napkin with the word “Joy” and some colorful splashes. I carefully tore around the design I wanted and separated the napkin layers (most have two or three plies – be sure to remove all but the top printed layer). I like to use the “lick and stick” method to get the layers apart, but washi tape or a little adhesive on your finger works great too.
To adhere the napkin, I brushed on a fresh coat of clear gesso and immediately laid the napkin piece into it while it was still wet. I lined up the straight edge with the page and gently smoothed the napkin using a deli sheet – this helps press the napkin into the gesso without tearing it. Once dry, I trimmed off any excess napkin from the edges.
Then, I added a second torn piece with the word “Joy” onto another part of the page, following the same process. To seal and protect the napkin (especially if you want to journal or doodle on top), I added one final layer of clear gesso over the top. This keeps ink from bleeding into the napkin and helps preserve the design over time. Once that dried, it was time for pen work!

Step 3: Adding Final Details
Using a black Pitt pen, I outlined the napkin pieces, especially around the word “Joy.” I like to skip spaces as I trace, giving it a loose, doodly, double-line look. I also created a little journaling box on the page by drawing simple lines with a double outline – again, nothing perfect, just expressive and artsy.
Some of the watercolor splotches reminded me of flowers, so I turned a few into “fried egg flowers” (as I like to call them) by adding a quick outline and center to each one. I added more dimension using glaze pens for the flower centers.
Of course, I couldn’t resist adding a little Stickles glitter glue. I traced the word “Joy” to make it sparkle and dotted some shimmer around the page. It’s a simple way to add dimension, but just remember to let it dry fully before closing your Bible!

I always recommend dating your entries. Sometimes, you won’t realize how God is moving until you look back. You can journal a prayer, rewrite the psalm in your own words, or simply jot down what this scripture means to you today. It’s a powerful way to document your faith walk and see His hand in your life over time.
Join the Faith Journaling Experience
If this process speaks to you or if something in your heart is nudging you to try Bible journaling, I’d love to invite you to join our Faith Journaling Experience. You’ll learn techniques, get access to printables, and connect with an amazing group of creative soul sisters. And no, you don’t need a Bible to begin. You can start with a journal or sketchbook until you’re ready. There’s no contract, no pressure… just an open invitation to grow creatively and spiritually.


0 Comments