


Supply List:
- White Cardstock
- Red Patterned Paper
- Blue Patterned Paper
- Lace Trim
- Heart Punch
- Frixion Pen
- Deep Sea – Chalk Ink
- Scotch Quick Dry Glue
- Hot Glue
- Scissors
- Ribbon, Twine, Buttons for Embellishments
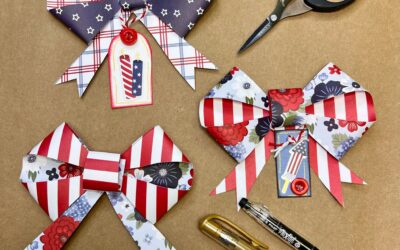
Let’s create a fun and festive red, white, and blue paper craft this summer season! These Patriotic Flag Pockets are not only adorable, but they’re super versatile, too! Whether you use them for scrapbook layouts, journaling, treat holders, or community service gifts, they’re the perfect way to celebrate and create. Plus, they’re beginner-friendly and a great way to use up leftover paper scraps.

Step 1: Create the Pocket Base
Start with two pieces of white cardstock. Cut one to 4” x 6” and the other to 4½” x 6½”. Place the 4×6 piece on top of the larger one, aligning the top edge. Use a pen (a Frixion Pen works great) to trace around the other three sides, then remove the smaller piece. Next, notch out the bottom corners of the larger cardstock piece where your traced lines meet.

Fold the side and bottom flaps upward along the scored lines. You’ll now have a base pocket shape. To assemble, you can either slide the smaller 4×6 piece inside the flaps and glue them closed on top, or glue the smaller piece directly onto the folded flaps from above. Either method works, and both will be covered in later steps.
Step 2: Cover with Red Patterned Paper
Once your pocket is glued together and set, it’s time to create the “flag” look. Cut a 4” x 6” piece of red patterned paper and glue it to the front of your pocket. Try to use bold red prints – polka dots, ginghams, florals, anything goes. Patterned paper adds visual interest and charm.
Step 3: Add the Blue Square
Next, cut a 2½” x 2½” square from a blue patterned paper. Think stars, florals, fireworks – any print that feels patriotic. Before gluing it down, I recommend inking the edges with chalk ink (I used Deep Sea Blue) for added dimension. Then, glue the blue square to the upper left corner of your red paper, just like a traditional flag.

Step 4: Punch and Attach the Heart
Using your favorite heart punch (about 2” wide), punch a heart from a coordinating red, white, or blue scrap. You can use a star shape instead, if you prefer. Ink the edges (I used Coal Miner, a soft black) and glue it right in the center of the blue square. You can glue it flat or use foam tape to pop it up for added dimension – it all depends on how you plan to use the pocket.
Step 5: Add Stripes with Lace or Ribbon
Now for the fun texture! Use thin strips of white crocheted lace, ribbon, washi tape, or even white paper to create four “stripes” across the red part of your flag. Cut two longer pieces for the right side and two shorter ones for under the blue square. Adhere with tacky glue (it dries clear), and press gently until set. Trim any excess lace once dry by flipping the pocket over and cutting along the edges.

Step 6: Embellish with Bows and Buttons
Add a small ribbon or baker’s twine bow to your heart, using a little glue to secure it in place. For an extra finishing touch, glue a small button or embellishment in the center of the bow. It’s the sweetest detail that brings the whole look together.
Your Patriotic Flag Pocket is now complete and ready to use! Tuck in a handwritten prayer, a photo, or a note in your journaling Bible. Use it on a scrapbook page to hold memorabilia from a summer BBQ or parade. Fill it with wrapped treats, gift cards, or even little thank-you notes and pass them out to veterans or neighbors as a sweet surprise. The possibilities are endless and the cuteness level is off the charts!

I go LIVE on my Facebook page every Friday at 11 am CST for a fun and easy Craft-n-Chat Session. Come learn something new while creating something beautiful!
Did you love this? Check out my online creative memberships! They are all a little different, and each is designed to ignite your imagination, inspire your craft, and connect you with fellow art enthusiasts. If you’re a creative looking for an online space to learn and thrive, we have something for everyone!


0 Comments