Supply List:
- 6×6 Chunky Canvas
- Mod Podge Matte
- Angel Napkin – The Christmas Story Bundle
- Plastic Wrap
- Heat Tool
- Sand Paper / Sanding Block
- Pitt Pens – Black
- Hot Glue
- Unicorn Stickles
- Scissors
- Thick Gold Ribbon and Twine of your choice
- Greenery Sprigs
- Embellishment for the center of your bow – could be a jingle bell
We’re transforming a simple chunky canvas into a beautiful piece of faith-based art using an exclusive napkin from a collection called The Christmas Story, which I designed myself! We’ll also be adding all of the details and embellishments, like ribbons, greenery, and sparkles. Whether you’re new to napkin art or looking for a seasonal project to personalize your space, this easy-to-follow guide will have you creating a beautiful piece of art in no time.
Applying Napkin Art to Your Canvas
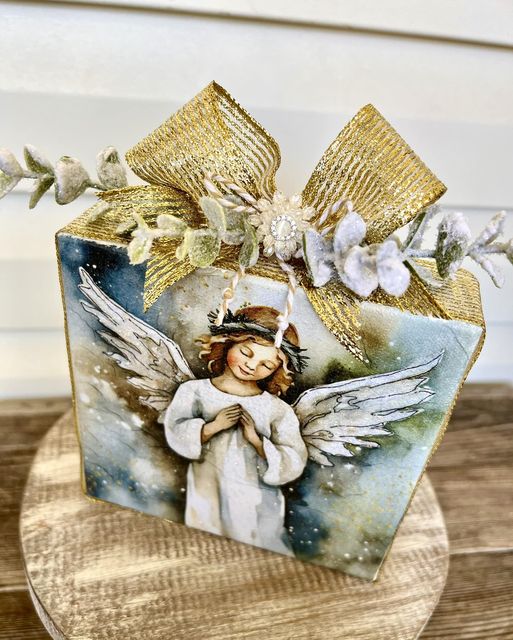
We’ll start by applying an angel napkin as the background on our canvas. Begin by cutting a square from the napkin and carefully separate the layers until you’re left with only the top layer of napkin art. Apply a coat of Mod Podge Matte to your canvas, place the napkin on top, and smooth it down using plastic wrap. Dry it with a heat tool, then gently sand off any excess napkin along the edges. Finally, add a top coat of Mod Podge Matte and let it dry completely.
Adding Details and Embellishments to Your Canvas
Use a black Pitt Pen to add detail lines to your napkin art. I’m focusing on outlining the wings and hair, but feel free to add lines wherever you’d like.
Next, apply hot glue along the edges of the canvas and wrap a thick gold ribbon around the entire canvas. To make a bow for the top, cut a piece of the same ribbon and form it into a ‘tribute ribbon’ shape. Gather the loop in the back, securing it in the center with baker’s twine or a thin ribbon. Cut flag ends on both sides of the ribbon, then hot glue the bow to the top of your canvas. Finally, tie the baker’s twine into a small bow for a finishing touch.
I’ll hot glue a few greenery sprigs and gold berry sprigs to the top of my canvas. Then, add something to the middle of your bow. I have a fancy button that I’ll hot glue to the center, but a jingle bell would work really well too! Finally, I’ll apply Stickles to her wings and her hair band.
With just a few supplies and simple techniques, you’ve created a beautiful angel canvas to celebrate your faith this holiday season. Whether you display it on your mantel, gift it to a loved one, or use it as part of your holiday centerpiece, this canvas is versatile, fun, and easy to make!
I go LIVE on my Facebook page every Friday at 11 am CST for a fun and easy Craft-n-Chat Session. Come learn something new while creating something beautiful!
Mark your Calendars: I’ll be making more of projects with The Christmas Story Napkin Bundle on Wednesday November 13th & December 4th on Facebook LIVE! Replays will be available along with a blog tutorial and streamed to YouTube!
If you enjoyed this project, I would love for you to Join the waitlist for The Napkin Club! In this club you will receive a individual bundle of napkins to create similar projects like this and so much more! You will gain access to our private facebook community page where you can connect with other napkin art crafters and watch my Lives Workshops that I share every Tuesday evening. Along with this membership, you will be able to login to the Club Hub, which is a website that holds all my past napkin workshops with over 4 years of creative content!
Thank you for being here! Happy Crafting!



0 Comments