


Supply List:
- Napkins
- Mod Podge Matte
- Chip Brush
I’m so excited to show you my slat wall in my studio, which is covered with beautiful napkin art. I’m sharing exactly how I apply my napkin art to make sure it lasts, and lots of other ideas for ways you can napkinize in your craft room, studio, or other places in your home.
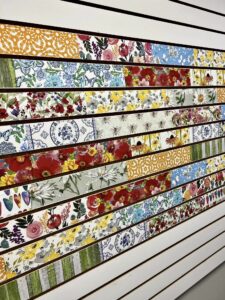
If you’re looking to add something fun to your creative space, I highly suggest adding a slat wall. It’s so versatile and budget-friendly, and you can add all of the pegs and things for organizing your stash. This section of slat wall is 8×4, but they also make smaller sections as well.
Applying Napkin Art to Your Wall
I’m going to share my exact process for decoupaging napkins right onto the slats. The first thing I do is cut my napkins into strips. My slats are about 2.5 inches, so that’s the measurement that I’m using. I don’t worry about the lengths.
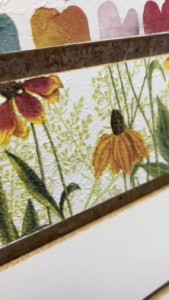
Once you have your strips cut, start separating your napkin plys until you have the top layer. Grab your napkin art, a chip paintbrush, Mod Podge Matte, and baby wipes. Use the baby wipes to wipe down the slat so it’s nice and clean for your artwork. Apply your Mod Podge directly to the wall and add your napkin art. At this point, you will see bubbles and wrinkles. Pounce onto your napkin with your chip brush to push down those bubbles and give your napkin some great texture! If you don’t want that texture, use some plastic wrap and your hands to smooth it down.
When it is completely dry, come back and apply a top coat of Mod Podge Matte to seal it in and protect your napkin art.
This is so fun to do and creates such a playful look in your craft room. Use napkins that go with your color scheme – whether that’s super colorful like mine or more neutral. You can do this on a regular wall, furniture, the back of a bookshelf, or literally any surface! Use napkins to transform your space from ordinary to a custom work of art.
I go LIVE on my Facebook page every Friday at 11 am CST for a fun and easy Craft-n-Chat Session. Come learn something new while creating something beautiful!
Join The Napkin Club where Unique Makers can connect, learn, and be inspired to create with the Individual Unique Napkin Collections that you will receive every month! A place where Napkin Lovers can unite and be inspired!


0 Comments