Supply List:
- Miss Tracy Creates: 12×6 Slat Sign
- Watercolor Palette
- White Simplicity Paint
- Mod Podge Matte
- Stickles – Unicorn
- Black Pitt Pens
- Plastic Wrap
- Sandpaper
- Heat tool
- Flower Accents
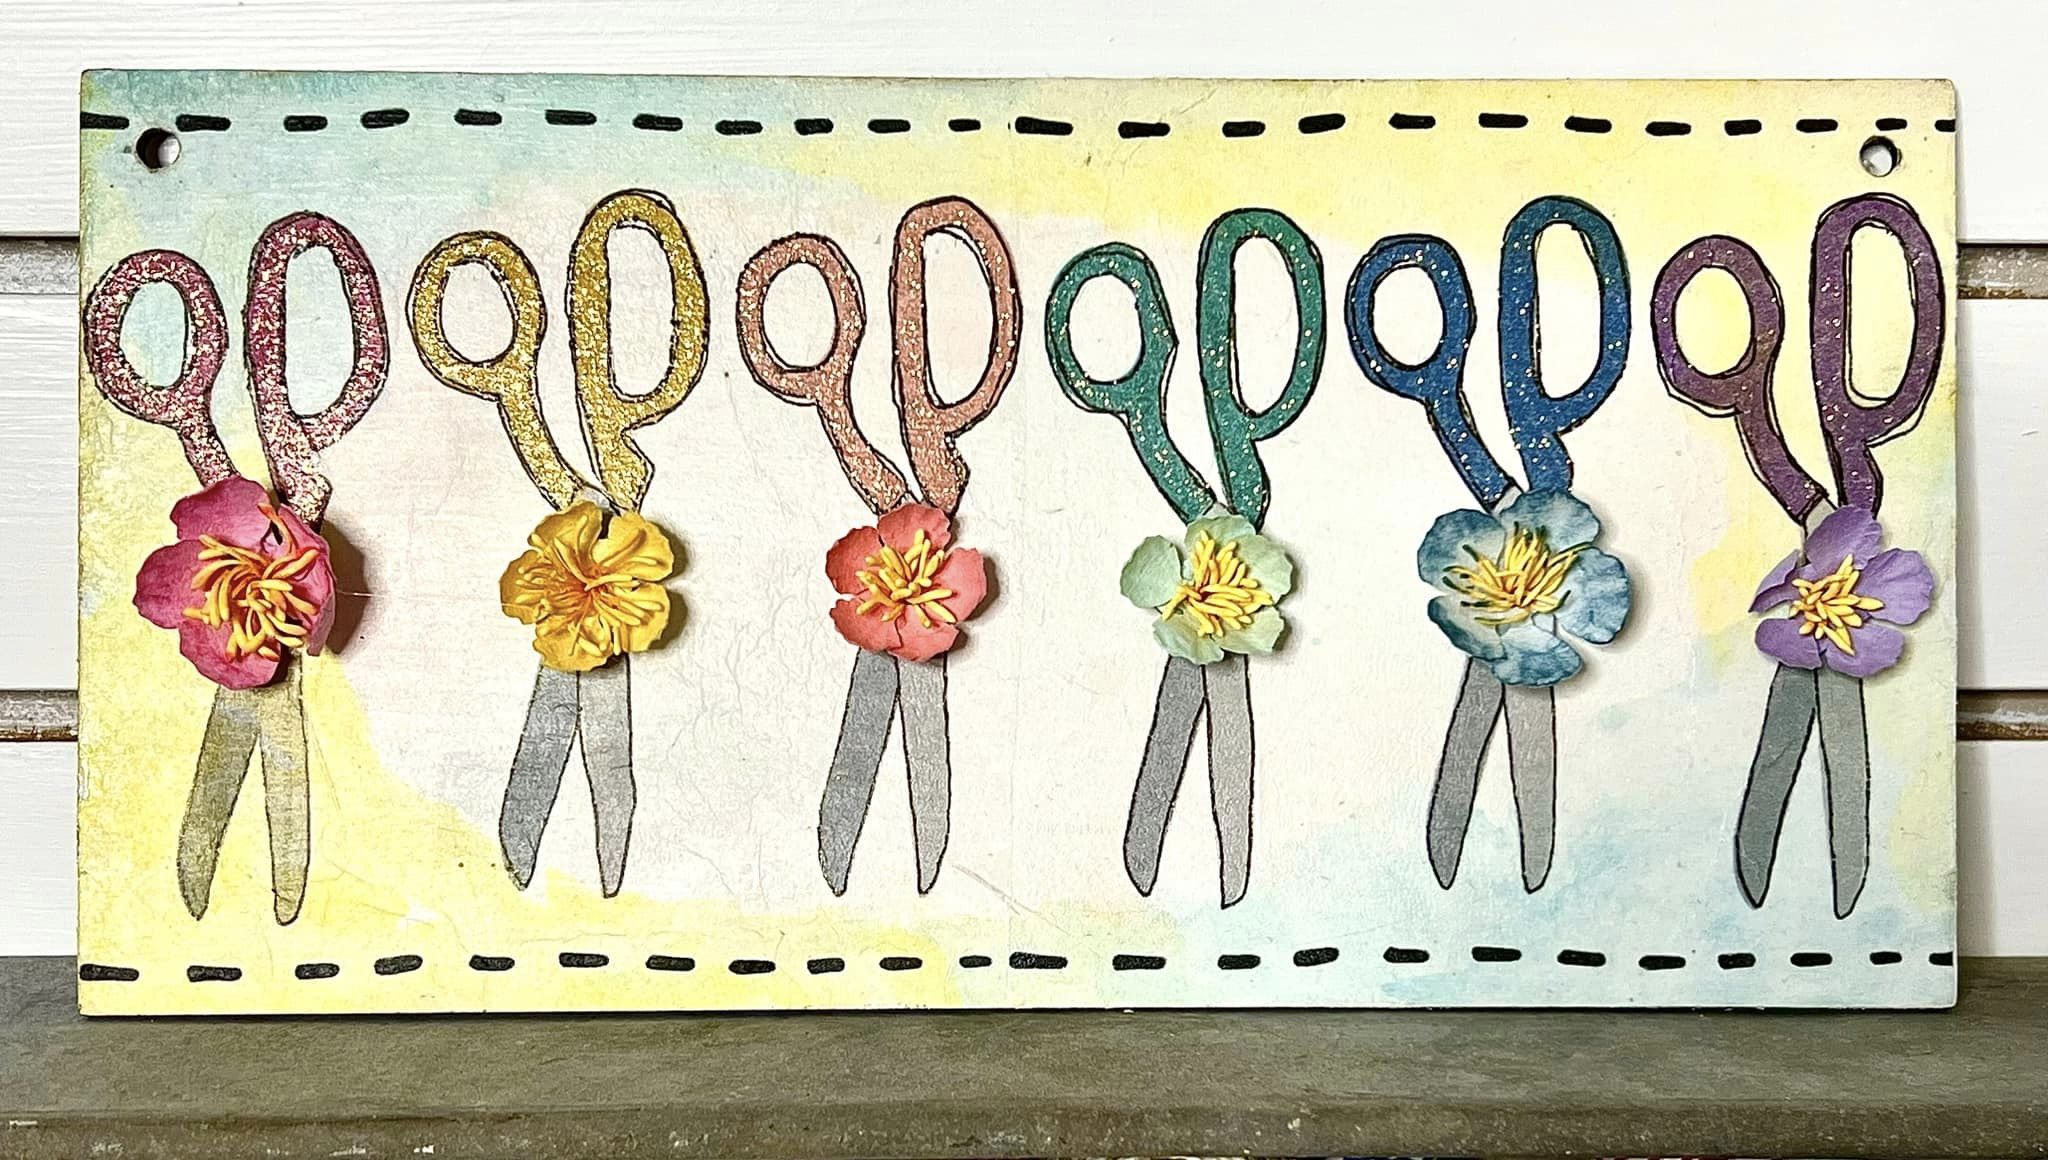
I’m finally making a sign for my craft room that I’ve been dreaming about for ages! I’m using an adorable Napkin Club exclusive napkin featuring scissors, a perfect little tribute to my love for creativity. I’ll be adding a vibrant watercolor border, napkin art, and colorful flowers to bring it all together.
Painting Your Wooden Sign
I’ll be using the smooth back side of this shiplap sign. First, I’ll apply a coat of Country Chic Paint in Simplicity to create a nice base layer. After drying it with a heat tool, I’ll add a second coat and dry again. Next, I’ll create a soft, colorful border using watercolor paints. To prep, mist your watercolor palette with water, then lightly dab color onto the sign – blue in two corners, yellow in the other two, and a bit of pink across the middle. For an even softer look, gently blot with paper towels. Once I’ve achieved the delicate background I want, I’ll dry it again with the heat tool.
Applying Napkin Art to Your Craft Sign
For this craft room sign, I’m using a napkin with colorful scissors to add a unique touch. Begin by cutting out two squares from the napkin and separating the plies until only the top printed layer remains. Apply a coat of Mod Podge Matte to your sign, carefully lay the napkin art on top, and gently smooth it down using plastic wrap. Repeat for the second napkin piece. Once both pieces are set, dry with a heat tool and sand off any excess napkin around the edges. Use a toothpick or similar tool to clear any napkin covering the holes. Finally, add a top coat of Mod Podge Matte to seal everything in, and dry once more.
Use a black Pitt Pen to add detail to the napkin art by outlining each pair of scissors. Aim for a loose, artsy doodle effect—perfection isn’t necessary here! Next, apply Stickles to each scissor handle for a bit of sparkle. I sorted through my flower stash and found matching flowers to add to each scissor, but buttons would work nicely too. Hot glue each flower to the center of the scissors for a pop of dimension. Finish it off by adding a ribbon for the hanger.
This craft room sign has become a one-of-a-kind piece that truly reflects creativity and joy! From the napkin art to the textured flowers and touches of sparkle, every element adds personality. It’s a great reminder of my passion for crafting, and it’s ready to brighten up the space every time I walk in!
If you make this project, I would LOVE to see yours! Share your Photos to me on Social Media! I go LIVE on my Facebook page every Friday at 11 am CST for a fun and easy Craft-n-Chat Session. Come learn something new while creating something beautiful!
Join the waitlist for The Napkin Club where Unique Makers can connect, learn, and be inspired to create with the Individual Unique Napkin Collections that you will receive every month! A place where Napkin Lovers can unite and be inspired!





Miss Tracy thank you for the beautiful craft projects and your joyful heart that you share throughout each week. Thank you to all the ladies
that help get the wonderful supplies and club materials
to us. So that we too will the ability to make them. Each one of you have been so sweet and helpful to us when help is needed. Thank you