Supply List:
- Shiplap Shapes Small Butterfly
- Red, White, and Blue Shiplap Napkin
- Fireworks Napkin
- Wooden Clothespin with Stand
- Simplicity – Country Chic Paint
- Mod Podge Matte
- Red and White Baker’s Twine
- 18-20 Gauge Wire
- Small Wooden Star
- Stickles
- Ribbon
- Hot Glue
- Plastic Deli Sheets
- Scissors
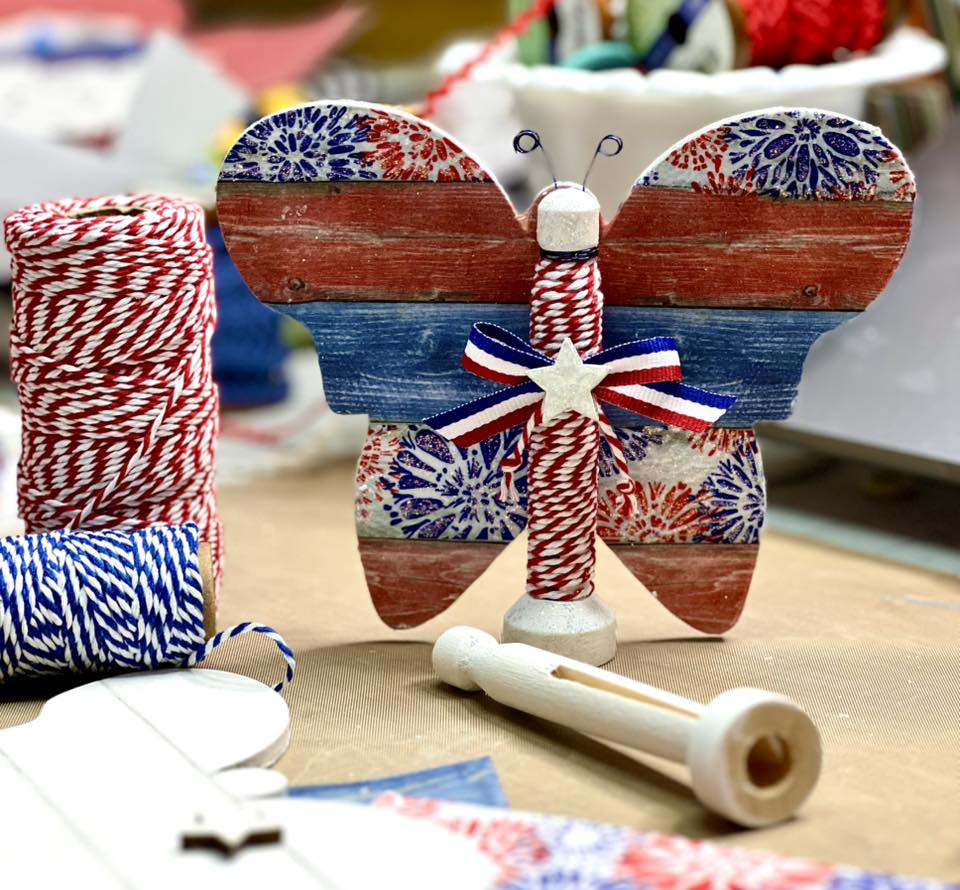
Looking for a fun and festive way to decorate for summer or the 4th of July? These adorable patriotic butterflies are the perfect mix of rustic charm and red, white, and blue sparkle – and they’re easier to make than you might think!
In this project, we’re turning wooden shiplap butterflies into stand-up decor using napkin art, baker’s twine, paint, and a few extra embellishments. Whether you display yours on a shelf, in a wreath, or standing proudly on a table, they’re sure to bring a little extra joy to your summer space.
Step 1: Prep and Paint the Butterfly Base
Start by giving your butterfly and clothespin a coat of Simplicity – Country Chic Paint. Use a baby wipe to create a soft white-washed effect on the shiplap wood – this allows your napkin art to shine while keeping a clean, rustic look. Be sure to paint the front, back, and sides of the butterfly and the stand (if using). Dry with a heat tool.
Step 2: Apply Napkin Art to Your Butterfly
Place your butterfly shape over the red, white & blue wood grain napkin and trace it. Cut out both a front and back piece so your butterfly is decorated on both sides. Keep the plies of the napkin intact while cutting – it’s easier to work with this way! Then gently separate the layers and use only the top printed ply for decoupaging.
Apply a coat of Mod Podge Matte to the butterfly and carefully press your napkin into place using plastic wrap or a deli sheet to smooth it out. Repeat on the back once the first side is dry. Optional: add pieces of the fireworks napkin to the white stripes for extra festive flair! Use Mod Podge around the edges to help the napkin lay down cleanly, or lightly sand excess once dry.
Step 3: Wrap the Clothespin Body
Attach the wooden stand to your clothespin body before wrapping! This ensures it still fits snugly. Wrap baker’s twine tightly around the clothespin for a pop of patriotic color. Use red/white on one and blue/white on another if you’re creating a pair. Secure the twine with a dab of hot glue at both the beginning and end.
Step 4: Add the Finishing Touches
Cut about 10 inches of colored wire. Twist it around the “neck” of the clothespin like a bread tie, then curl the ends using a small paintbrush to create cute swirls. Add a dot of hot glue to keep them in place on the back side of the body.
Hot glue the clothespin body to the center of the butterfly. Be sure the bottom of the stand sits lower than the wings to allow it to stand easily. If you’re placing it outdoors, use a mix of hot glue and E6000 for a stronger hold.
Finally, make a simple ribbon bow and attach it to the middle of your butterfly with hot glue. Add a small wooden star (or a cute button!) to the center of the bow. Then, bring on the sparkle! Use Stickles to highlight the fireworks, wings, or star embellishment for just the right amount of shimmer.
I hope this project added a little sparkle to your day and inspired you to get creative with your summer decor! Whether you’re making just one butterfly or a whole flutter of them, this is a fun way to celebrate the season with color, texture, and a patriotic twist
Watch the replay here!
I go LIVE on my Facebook page every Friday at 11 am CST for a fun and easy Craft-n-Chat Session. Come learn something new while creating something beautiful!
Join the waitlist for The Napkin Club where Unique Makers can connect, learn, and be inspired to create with the Individual Unique Napkin Collections that you will receive every month! A place where Napkin Lovers can unite and be inspired!






0 Comments